MVVM Android
MVVM Android is the framework based on Android Architecture components, which gives you set of base classes to implement concise, testable and solid application. It combines built-in support for Dagger 2 dependency injection, View DataBinding, ViewModel and RxJava use cases. Architecture described here is used among wide variety of projects and it's production ready.
Download

Getting started - Minimal project file hierarchy
Minimal working project must contain files as presented in example-minimal
module. File hierarchy might looks like this:
example-minimal
`-- src/main
    |-- java/com/example
    |   |-- injection
    |   |   |-- ActivityBuilderModule.kt
    |   |   |-- ApplicationComponent.kt
    |   |   `-- ApplicationModule.kt
    |   |-- ui
    |   |   |-- base/BaseActivity.kt
    |   |   `-- main
    |   |       |-- MainActivity.kt
    |   |       |-- MainActivityModule.kt
    |   |       |-- MainView.kt
    |   |       |-- MainViewModel.kt
    |   |       |-- MainViewModelFactory.kt
    |   |       `-- MainViewState.kt
    |   `-- App.kt
    `-- res/layout/activity_main.xml
Keep in mind this description focuses on architecture .kt files. Android related files like an
AndroidManifest.xml are omitted. Let's describe individual files one by one:
ActivityBuilderModule.kt
File contains Dagger module class that takes responsibility of proper injection
into Activities. This is the place where every Activity and its ActivityModule
in project must be specified to make correct ViewModel injection work.
ApplicationComponent.kt
ApplicationComponent interface combines your singleton Dagger modules and defines
how DaggerApplicationComponent should be generated.
ApplicationModule.kt
Application module definition. Your singleton scoped objects might
be specified here and injected wherever needed. Example implementation:
BaseActivity.kt
All of Activities in the project should inherit from this class to make DataBinding work properly.
Be aware of fact BR class used in this class is generated when there is at least one layout file
with correctly defined data variables. Read more here.
MainActivity.kt
Example Activity implementation. viewModelFactory and layoutResId must be overridden in every
Activity in order to make ViewModel injection and DataBinding work. ActivityMainBinding used
in BaseActivity constructor is generated from related activity_main.xml layout file. Make sure this file
exists and have root tag <layout> before you try to build your code. ViewModel can be
accessed through derived viewModel field.
MainActivityModule.kt
MainActivity scoped module. It becomes useful when you want to provide specific
activity related configuration e.g.:
MainView.kt
Interface representing actions executable on your Activity/Fragment. These actions
might be invoked directly from xml layout thanks to view data variable.
MainViewModel.kt
Activity/Fragment specific ViewModel implementation. You can choose between extending
BaseViewModel or BaseRxViewModel with build-in support for RxJava based use cases.
MainViewModelFactory.kt
Factory responsible for ViewModel creation. It is injected in Activity/Fragment.
MainViewState.kt
State representation of an screen. Should contain set of LiveData fields observed
by Activity/Fragment. State is stored in ViewModel thus survives screen rotation.
activity_main.xml
Layout file containing proper DataBinding variables initialization. Make sure correct
types are defined.
Use Cases
Modules cr-usecases and rx-usecases contains set of base classes useful for easy execution of
background tasks based on Coroutines or RxJava streams respectively. In terms of Coroutines
two base types are available - UseCase (single result use case) and FlowUseCase (multi result use case).
RxJava base use cases match base Rx "primitives": ObservableUseCase, SingleUseCase, FlowableUseCase, MaybeUseCase
and finally CompletableUseCase.
Following example describes how to make an API call and how to deal with
result of this call.
LoginUseCase.kt
LoginViewState.kt
LoginViewModel.kt
Synchronous execution of cr-usecase
Module cr-usecases allows you to execute use cases synchronously.
execute method returns a Result that can be either successful Success or failed Error.
launchWithHandler launches a new coroutine encapsulated with a try-catch block. By default exception thrown in launchWithHandler is rethrown but it is possible to override this behavior with defaultErrorHandler or just log these exceptions in logUnhandledException.
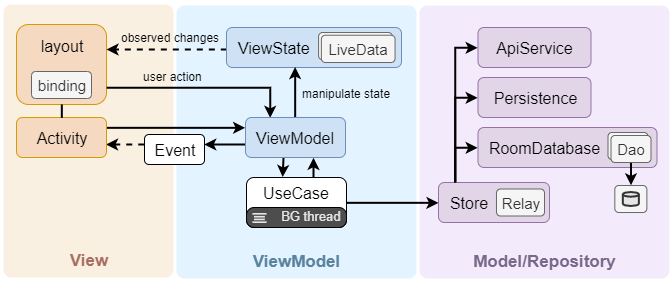
UI changes flow
There are two main ways how to reflect data changes in UI. Through ViewState observation
or one-shot Events.
ViewState observation
You can observe state changes and reflect these changes in UI via DataBinding
observation directly in xml layout:
Events
Events are one-shot messages sent from ViewModel to an Activity/Fragment. They
are based on LiveData bus. Events are guaranteed to be delivered only once even when
there is screen rotation in progress. Basic event communication might look like this:
MainEvents.kt
MainViewModel.kt
MainActivity.kt
Stores (Repositories)
All our applications respect broadly known repository pattern. The main message this
pattern tells: Define Store (Repository) classes with single entity related business logic
eg. UserStore, OrderStore, DeviceStore etc. Let's see this principle on UserStore class
from sample app:
With this approach only one class is responsible for User related data access. Besides
custom classes, Room library Daos or for example Retrofit API interfaces might be
perceived on the same domain level as stores. Thanks to use cases we can easily access,
manipulate and combine this kind of data on background threads.
We strictly respect this injection hierarchy:
| Application Component | Injects |
|---|---|
Activity/Fragment |
ViewModel |
ViewModel |
ViewState, UseCase |
UseCase |
Store |
Store |
Dao, Persistence, ApiService |
Testing
In order to create successful applications, it is highly encouraged to write tests for your application. But testing can be tricky sometimes so here are our best practices and utilities that will help you to achieve this goal with this library.
See these tests in example module for more detailed sample.
ViewModel testing
mvvm-test dependency contains utilities to help you with ViewModel testing.
ViewModelTest that should be used as a base class for view model tests since it contains JUnit rules for dealing with a live data and with RxJava in tests.
See these tests in example module for more detailed sample of view model testing.
Events testing
The spy object should be used for an easy way of testing that expected events were sent to the view.
Mocking of observeWithoutOwner
When you are using observeWithoutOwner extensions then everyObserveWithoutOwner will be helpful for mocking of these methods.
So if a method in the view model looks somehow like this:
then it can be mocked with the following method:
invoke(...) call will invoke a lambda argument passed to the observeWithoutOwner method in the tested method.
Mocking of Use Cases
Add rx-usecase-test or cr-usecase-test dependencies containing utilities to help you with mocking use cases in a view model.
Since all 'execute' methods for use cases are implemented as extension functions, we created testing methods that will help you to easily mock them.
So if a method in the view model looks somehow like this:
then it can be mocked with the following method:
In case that use case is using nullable arguments:
Activity and Fragment tests
mvvm-test dependency contains utilities to help you with espresso testing.
If you want to test Activities or Fragments then you have few possibilities. You can test them with the mocked implementation of a view model and view state, or you can test them with the real implementation of a view model and view state and with mocked use cases.
Since Fragments and Activities from the dagger module are using AndroidInjection, we created utilities to deal with this.
In your tests, you can use doAfterActivityInjection and doAfterFragmentInjection to overwrite injected dependencies. These methods are called right after AndroidInjection and that allows overwriting of needed dependencies. In the following example, we are replacing the view model with the implementation that is using a view model with mocked dependencies and some random class with mocked implementation.
See these tests in example module for more detailed samples of espresso test that can be executed as local unit tests or connected android tests.
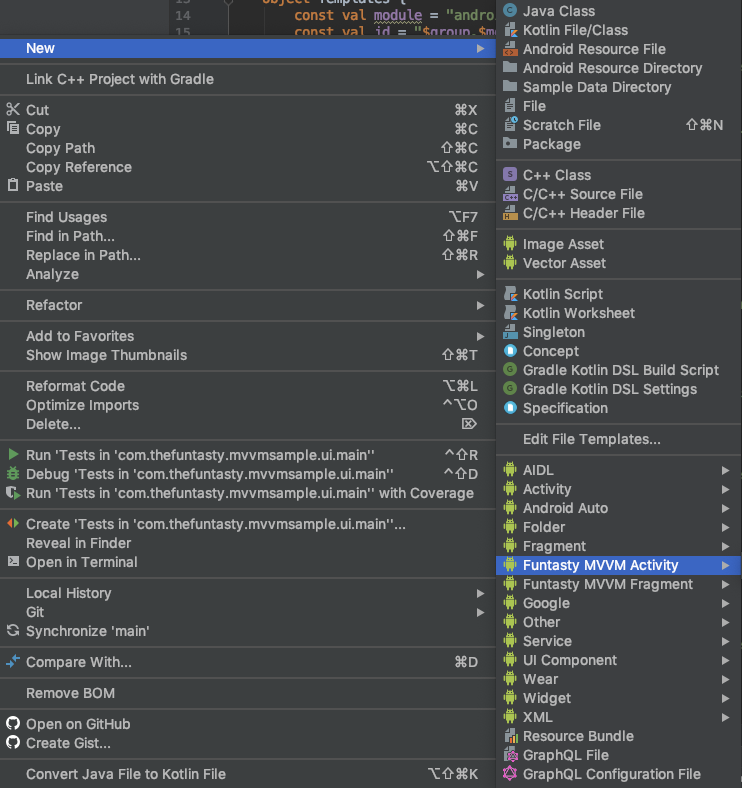
Templates
Our MVVM framework requires several files to be created with each new Activity or Fragment. To make the process of screen creation smooth, our framework is shipped with a template module. It contains templates for creating "MVVM Activity" and "MVVM Fragment" via Android Studio GUI.
To import templates into Android Studio follow these steps:
On Mac/Linux
- Add plugin into your project Gradle file
plugins {
    id "com.thefuntasty.mvvm.android-templates" version "LatestVersion"
}
- Sync Gradle dependencies
- Run from your Android Studio terminal
./gradlew copyTemplates
- Restart Android Studio
Note: You can also run this task from Gradle sidebar in Android Studio, you can find it under
Tasks -> thefuntasty -> copyTemplates
On Windows
-
Copy folders MVVMActivity and MVVMFragment from mvvm-android\templates\src\main\resources\templates in to C:\Program Files\Android\Android Studio\plugins\android\lib\templates\other
-
Restart/Start Android Studio
When the templates are in place you can use them directly from GUI