Starsector Mod Template using Gradle and IntelliJ
v1.2.0
Description
This is a template for a generic Starsector mod using Java.
There is a video walkthrough to set it up here: https://www.youtube.com/watch?v=q63p67f-F8k.
Simply download it as a .zip, clone it using git clone https://github.com/davidwhitman/starsector-mod-template.git, or click “Use this template” and then follow the instructions below.
When you are done, you will have a mod that does nothing, but is ready for anything to be added.
Written for IntelliJ Community (free download), but should work with any IDE. Latest version of IntelliJ is 2021.2 as of writing.
Features
- A one-click command to build your mod and launch Starsector with full breakpoint debugging.
- Automatically generated
mod_info.jsonand Version Checker files.- Set your mod’s version once in
build.gradle.ktsand both files will be updated.
- Set your mod’s version once in
- A new GitHub Release will be created automatically whenever a git tag is pushed, if the mod is hosted on GitHub.
- Delete the
.githubfolder to disable this.
- Delete the
- Gradle build system, works with any IDE (but you don’t need to know what Gradle is).
Initial Setup Checklist
(or follow along with this video tutorial)
Step 1
Choose whether you wish to manually update the mod_info.json and Version Checker files (manual updating is the default option) or have it done automatically (requires slightly more setup).
First do these, then choose Option A or Option B
- In
build.gradle.ktsSECTION A, set themodNamevariable. - In
build.gradle.ktsSECTION A, checkstarsectorDirectoryfor correctness. It will need to be updated if you’ve installed the game to a non-default location or aren’t on Windows.
Option A (recommended): I will manually update my mod_info.json and Version Checker files
- Go and update the
mod_info.jsonand Version Checker (if you are supporting Version Checker) files by hand
Option B: Automatically update my mod_info.json and Version Checker files from a single config file
- In
build.gradle.ktsSECTION B, setshouldAutomaticallyCreateMetadataFilestotrue, then set the rest of the variables inSECTION B. Whenever you would normally manually updatemod_info.jsonor Version Checker, update these values inSECTION Binstead and, upon mod recompile, they will be updated.
Step 2
Option 1: If starting a brand-new project
- Change the package from the template default. In IntelliJ, open up
ExampleEveryFrameScript, right-click on the first line in the file (package com.example;) and go toRefactor - Rename. From there, you may renamecom.exampleto anything lowercase you like (e.g. “wisp.perseanchronicles”). If it pops up a refactoring preview, keep everything selected and clickDo Refactor.- You will put any new code you write into the
src/com/exampledirectory (orsrc/wisp/perseanchroniclesor whatever you named it in the previous step).
- You will put any new code you write into the
- Any other assets, such as
graphicsordata, can go directly into the top-level folder (next to, but not inside,src).
Option 2: If importing existing code
- Copy the code you want to use into the
srcdirectory.- For example, if your code was in a folder structure like
data/scripts(the .java files would start with a line likepackage data.scripts;), then the new folder structure would besrc/data/scripts. - If in doubt, look at the package name at the top of a
.javafile, then look for that folder. For example, Nexerelin has a file that starts withpackage exerelin;, so we look inside Nexerelin’sjars/src.zipand findsources/ExerelinCore/exerelin. We copy only theexerelinfolder into our template’ssrcfolder so that the.javafile’s location relative tosrcperfectly matches the package. - The
mainfolder insrccan be ignored. It would be used for new projects, but is not needed for importing.
- For example, if your code was in a folder structure like
- Any other assets, such as
graphicsordata, can go directly into the top-level folder (next to, but not inside,src).
Optional
- In
settings.gradle, changerootProject.name = 'template'to be your new name instead.- This changes how IntelliJ itself refers to the project, but shouldn’t affect anything else.
- Change
LICENSEto something else. GPL-3 is a popular one.
IntelliJ Configuration
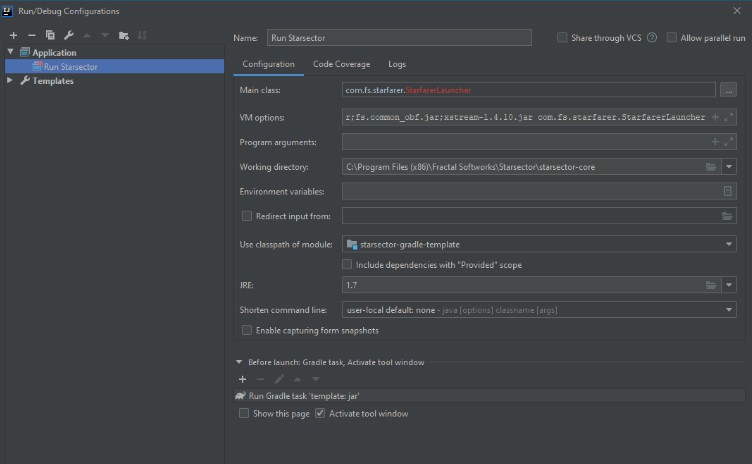
Ensure that your run configuration is correct:
-
In IntelliJ, click
Run - Edit Configurations. -
Select “Run Starsector”
-
Set Working directory to the location of your
starsector-corefolder, if different than what’s currently there. -
Check other values to make sure they fit your Starsector install. By default, they are set for a typical Windows install.
-
Click Ok. You should now be able to choose Run Starsector from the Run menu and then click the Debug button (the icon of a bug)

-
Don’t forget to enable your mod on the Starsector launcher!
-
If you are running on linux, the VM Arguments should instead be
-server -agentlib:jdwp=transport=dt_socket,server=y,suspend=y,address=5005 -Djava.library.path=./native/linux -Xms1536m -Xmx1536m -Xss2048k -classpath janino.jar:commons-compiler.jar:commons-compiler-jdk.jar:starfarer.api.jar:starfarer_obf.jar:jogg-0.0.7.jar:jorbis-0.0.15.jar:json.jar:lwjgl.jar:jinput.jar:log4j-1.2.9.jar:lwjgl_util.jar:fs.sound_obf.jar:fs.common_obf.jar:xstream-1.4.10.jar -Dcom.fs.starfarer.settings.paths.saves=./saves -Dcom.fs.starfarer.settings.paths.screenshots=./screenshots -Dcom.fs.starfarer.settings.paths.mods=./mods -Dcom.fs.starfarer.settings.paths.logs=. -Dcom.fs.starfarer.settings.linux=true com.fs.starfarer.StarfarerLauncher
Example for this template

Adding new libraries as dependencies
By default, only LazyLib is added. To add other mod dependencies, open build.gradle.kts and navigate down to the dependencies section (SECTION D.2).
The easiest thing to do is to copy the existing LazyLib dependency, which starts with compileOnly, and modify it to point to the folder containing the .jar file(s) of the mod you’re adding.
After making any change to the build.gradle.kts file, click the “Load Gradle changes” button that should have appeared in the top-right corner.

Releasing (automatic)
Tag a commit and push it. The tag name will become a release name, and the commit message will become a release message.
git commit -m "My first release" # you can just `git commit` and type a body of release as well
git push origin master           # Send the commit to your repo (no release yet)
git tag 1.0.0                    # No release yet, it's only local now
git push --tags origin master    # Release is happening now
In-Depth Description & Purpose
This is a template for a generic Starsector mod that uses Gradle as its build system, Kotlin as the Gradle DSL, and Java and/or Kotlin as the programming language.
Knowledge of Kotlin is not required.
One of the main goals is to move as much of the build process out of IntelliJ as possible, so that anybody can pull down the source code and build the project with minimal hassle. IntelliJ is not even required to build the mod, which can be done using the Gradle wrapper on the command line (for advanced users only, not described here).
Another goal is to have more project configuration as code, rather than IDE-specific files. That way, they’ll get versioned (and be shared, as mentioned).
Explanation of Folders/Files
.git/Optional. Used by git to store all git-related information. May be deleted if you are not using git..github/Optional. May be used to automatically create a new Release on GitHub by pushing a tag (see aabove). May be deleted if not using that..gradle/Required. Used by Gradle, the build script. Will be recreated if you delete it..idea/Required. Used by IntelliJ to store settings and configuration..run/Optional. Used by IntelliJ, contains a ready-to-use configuration for running the game. May be deleted if you want to make your own Run Configuration instead.data/Optional. Used by Starsector, this folder just contains some common files that mods use that you would probably end up creating yourself. May be deleted if you don’t need it.gradle/Required. Used by Gradle, the build script, and removing it will prevent the project from compiling.libs/Required. Contains the vanilla Starsector code used to compile the mod.readme_resources/Optional. contains files used to display this readme. May be deleted.src/Optional? Contains example source code which you will presumably build upon. May be deleted if your mod doesn’t have any code (but then why use this template…?).gitignoreOptional. Used by git to determine which files should not be committed (for example, not to commit temp files used during the build process). May be deleted if not using git.build.gradle.ktsRequired. This is the build script. The mod will not compile without it.gradle.propertiesRequired. Used by Gradle, the build script, to configure itself.gradlewOptional. This is one way to compile the mod. Keep this if using GitHub Actions or you are on Linux/MacOS.gradlew.batOptional. This is one way to compile the mod. Keep this if using Windows.LICENSEOptional. This is the license file, delete or modify it to your liking.mod_info.jsonRequired. Obviously.README.mdRequired? You tell me.settings.gradleRequired. Change the line in here to change what IntelliJ calls the project (in the Windows taskbar and window title).yourName_uniqueid.versionOptional. This is a sample Version Checker file. May be deleted if not using Version Checker (but you should).
Other
Author: Wisp
Contributors
- Jaghaimo for tons of suggestions, inspiration, and corrections.
- ruddygreat for battling her way through using an earlier version and providing lots of clear, much-needed feedback.
License: GPL v3