App Builders 2022 – Modern Android Techniques
This app is the sample project used for the Modern Android Techniques workshop at App Builders 2022. It is a weather app called Shine, built using the latest Android technologies.

Your Mission
You are a newly hired Android Engineer, starting out at Sunshine Inc. A new startup looking to disrupt the weather forecasting industry.
You’ve been tasked with building the 1st iteration of Shine, the Android app for Sunshine to show off their weather forecasting abilities. As a cutting edge engineer, you’d like to build the app using the latest technologies.
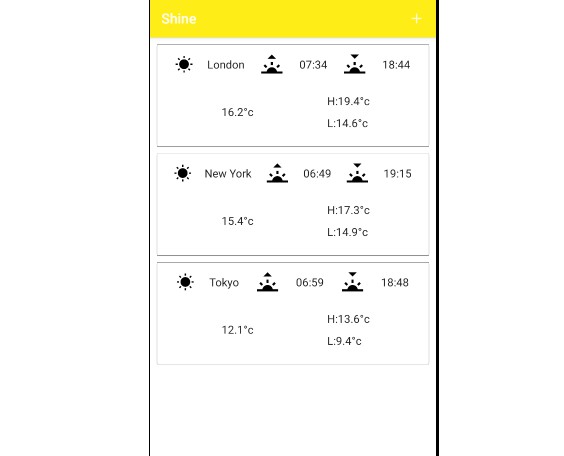
The product designers at Sunshine have provided the following design. They also provide icons to use in the app.
The backend engineers have provided a test endpoint, providing the following response.
The main screen shows the weather at locations a user has selected. Tapping on a location opens a detail screen, showing detailed weather information about the location. The screen also has a menu item in the toolbar, tapping it opens the detail screen.
The location screen shows a list of locations a user can select from. When the user taps a location it’s id is cached within the app and used to acquire the weather for the location. The weather for the location is shown on the main screen and detail screen.
The detail screen shows detailed weather information about the location.
Build the app and make Sunshine Inc proud!
Step 1 – Create the Project
Create the project in Android Studio, making sure to call the app name Shine.
As an app using the latest technologies, you should setup the project using the Empty Compose Activity template.
You may find the following web page useful.
Step 2 – Create the Main Screen
Using the design, create the main screen using Jetpack Compose.
You may find these web pages useful:
Step 3 – Building up the domain / data layer
By this point you should have a screen similar to the main screen design.
Next, you need to be able to populate the app with data.
Create a ViewModel for the Main Screen, along with a repository and data source to receive weather data.
You can make a request to this URL to get weather data into the app.
Tip: You may end up with a number of dependencies, rather than remembering to create them. It could be useful to use a dependency injection library
You may find these web pages useful:
Step 4 – Create the Location Screen
Adding the location screen will the app to show the weather for specific locations.
Create the screen similar to the design in Miro. Create a ViewModel and use the repository and data source you created in step 3 to query the available locations within the ViewModel.
Show the returned locations in a list.
Each location should be tappable. When tapped, cache the location id to the app via the repository and return to the main screen.
You may find these web pages useful:
Step 5 – Hook the main screen and location screen together
Now the main screen and location screen are built. It’s time to allow navigation between the two.
Add a menu item on the main screen, allowing a user to navigate to the location screen.
You should also add a component that handles navigation across the app.
You may find these web pages useful for this step:
Step 6 – Using the location id on the Main Screen
Once the location id is saved to the app, the id can be used to know what locations to show on the main screen.
Update the business logic of the main screen, so it only shows locations for ids saved to the app.
A filter operation could be useful here.
Step 7 – Navigating to the detail screen
Add a click listener to each selected location on the main screen, so it can navigate to the detail screen.
Next, create the foundation of the detail screen, then add it to the navigation component.
You may need to pass the location id into the detail screen, so it knows which location to show.
You may find this web page useful:
Step 8 – Build up the detail screen
Complete the detail screen by following the designs in miro.
Make sure to follow best practices for architecture, by creating a ViewModel and querying data through its repositories / datasources.
Step 9 – Theming the App
Now that Shine is built and functional, it’s time to add some theming to it.
Update the default compose theme to ensure it provides the colours in the design.
Hint: The colours for the theme are available here
You may find this web page useful:
Bonus Step – Switching the title on each screen
The title on the screen stays static unless told otherwise. Add a way for this to be dynamic for each screen.