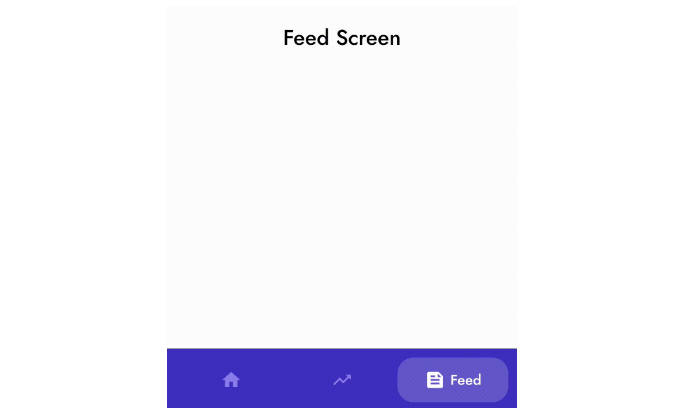
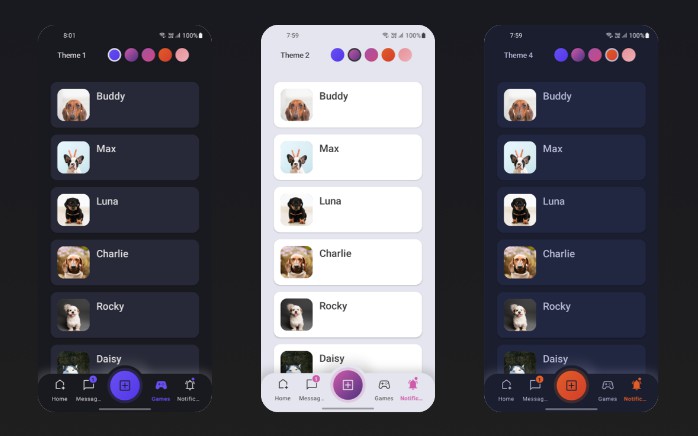
FastBottomNavigationBar
A lightweight & fast Android material bottom navigation bar library
GIF
Design Credits
All design and inspiration credits belong to Sanjay Chintamani Patel.
Usage
- Create menu.xml under your res/menu/ folder
<?xml version="1.0" encoding="utf-8"?>
<menu xmlns:android="http://schemas.android.com/apk/res/android">

    <item
        android:id="@+id/item0"
        android:title="@string/menu_dashboard"
        android:icon="@drawable/ic_dashboard_white_24dp"/>

    <item
        android:id="@+id/item1"
        android:title="@string/menu_leaderboard"
        android:icon="@drawable/ic_multiline_chart_white_24dp"/>

    <item
        android:id="@+id/item2"
        android:title="@string/menu_store"
        android:icon="@drawable/ic_store_white_24dp"/>

    <item
        android:id="@+id/item3"
        android:title="@string/menu_profile"
        android:icon="@drawable/ic_person_outline_white_24dp"/>

</menu>
- Add view into your layout file
<me.iaapteck.lib.FastBottomNavigationBar
    android:id="@+id/bottomBar"
    android:layout_width="match_parent"
    android:layout_height="70dp"
    app:backgroundColor="@color/colorPrimary"
    app:badgeColor="@color/colorBadge"
    app:menu="@menu/menu_bottom"/>
- Use FastBottomNavigationBar callbacks in your activity
bottomBar.onItemSelected = {
    status.text = "Item $it selected"
}

bottomBar.onItemReselected = {
    status.text = "Item $it re-selected"
}
OR
bottomBar.setOnItemSelectedListener(object: OnItemSelectedListener {
    override fun onItemSelect(pos: Int) {
        status.text = "Item $pos selected"
    }
})

bottomBar.setOnItemReselectedListener(object: OnItemReselectedListener {
    override fun onItemReselect(pos: Int) {
        status.text = "Item $pos re-selected"
    }
})
Note: For projects without kotlin, you may need to add
org.jetbrains.kotlin:kotlin-stdlib:$kotlinVersionto your dependencies since this is a Kotlin library.
Use FastBottomNavigationBar with Navigation Components.
Coupled with the Navigation Component from the Android Jetpack, FastBottomNavigationBar offers easier navigation within your application by designating navigation to the Navigation Component. This works best when using fragments, as the Navigation component helps to handle your fragment transactions.
- Setup Navigation Component i.e. Add dependenccy to your project, create a Navigation Graph etc.
- For each Fragment in your Navigation Graph, ensure that the Fragment’s
idis the same as the MenuItems in your Menu i.e res/menu/ folder
<?xml version="1.0" encoding="utf-8"?>
<menu xmlns:android="http://schemas.android.com/apk/res/android">

    <item
        android:id="@+id/first_fragment"
        android:title="@string/menu_dashboard"
        android:icon="@drawable/ic_dashboard_white_24dp"/>

    <item
        android:id="@+id/second_fragment"
        android:title="@string/menu_leaderboard"
        android:icon="@drawable/ic_multiline_chart_white_24dp"/>

    <item
        android:id="@+id/third_fragment"
        android:title="@string/menu_store"
        android:icon="@drawable/ic_store_white_24dp"/>

    <item
        android:id="@+id/fourth_fragment"
        android:title="@string/menu_profile"
        android:icon="@drawable/ic_person_outline_white_24dp"/>

</menu>
Navigation Graph i.e res/navigation/ folder
<?xml version="1.0" encoding="utf-8"?>
<navigation xmlns:android="http://schemas.android.com/apk/res/android"
    xmlns:app="http://schemas.android.com/apk/res-auto"
    xmlns:tools="http://schemas.android.com/tools" android:id="@+id/nav_graph"
    app:startDestination="@id/first_fragment">

    <fragment android:id="@+id/first_fragment"
        android:name="me.iaapteck.fastbottomnavigationbar.FirstFragment" android:label="Dashboard"
        tools:layout="@layout/fragment_first">
        <action android:id="@+id/action_firstFragment_to_secondFragment"
            app:destination="@id/second_fragment" />
    </fragment>
    <fragment android:id="@+id/second_fragment"
        android:name="me.iaapteck.fastbottomnavigationbar.SecondFragment"
        android:label="Leaderboard" tools:layout="@layout/fragment_second">
        <action android:id="@+id/action_secondFragment_to_thirdFragment"
            app:destination="@id/third_fragment" />
    </fragment>
    <fragment android:id="@+id/third_fragment"
        android:name="me.iaapteck.fastbottomnavigationbar.ThirdFragment" android:label="Store"
        tools:layout="@layout/fragment_third">
        <action android:id="@+id/action_thirdFragment_to_fourthFragment"
            app:destination="@id/fourth_fragment" />
    </fragment>
    <fragment android:id="@+id/fourth_fragment"
        android:name="me.iaapteck.fastbottomnavigationbar.FourthFragment" android:label="Profile"
        tools:layout="@layout/fragment_fourth" />
</navigation>
- In your activity i.e
MainActivity, create an instance ofPopupMenuwhich takes acontextand ananchor(pass in null) and then inflate thisPopupMenuwith the layout menu for theFastBottomNavigationBar. - Get a reference to your
FastBottomNavigationBarand callsetupWithNavController()which takes in aMenuandNavController, pass in the menu of the previously instantiatedPopupMenui.e.(popUpMenu.menu) and yourNavController. - Preferably set this up in a function as shown below and call this function i.e. (
setupSmoothBottomMenu()) in theonCreatemethod of your activity.
N.B: Sample app makes use of ViewBinding to get reference to views in the layout.
   private fun setupSmoothBottomMenu() {
        binding.bottomBar.setupWithNavController(navController)
   }
ActionBar
You can also setup your ActionBar with the Navigation Component by calling setupActionBarWithNavController and pass in your NavController.
N.B: Your app needs to have a Toolbar for setupActionBarWithNavController to work. If your app theme doesn’t have a Toolbar i.e. (Theme.AppCompat.Light.NoActionBar) you would need to:
- Add one to your layout i.e.
 <com.google.android.material.appbar.AppBarLayout
        android:id="@+id/app_bar_layout"
        android:layout_width="match_parent"
        android:layout_height="wrap_content"
        app:layout_constraintEnd_toEndOf="parent"
        app:layout_constraintStart_toStartOf="parent"
        app:layout_constraintTop_toTopOf="parent">
        <androidx.appcompat.widget.Toolbar
            android:id="@+id/toolBar"
            android:layout_width="match_parent"
            android:layout_height="wrap_content" />
    </com.google.android.material.appbar.AppBarLayout>
- Set the support action bar to your
ToolbarusingsetSupportActionBar(your_toolbar_id)in this casesetSupportActionBar(binding.toolBar)
We now have something like this:
 private lateinit var navController: NavController
 private lateinit var binding: ActivityMainBinding

    override fun onCreate(savedInstanceState: Bundle?) {
        super.onCreate(savedInstanceState)
        binding = ActivityMainBinding.inflate(layoutInflater)
        setContentView(binding.root)
        navController = findNavController(R.id.main_fragment)
        setupActionBarWithNavController(navController)
        setupSmoothBottomMenu()
    }

    private fun setupSmoothBottomMenu() {
        binding.bottomBar.setupWithNavController(navController)
    }

    //set an active fragment programmatically
    fun setSelectedItem(pos:Int){
        binding.bottomBar.setSelectedItem(pos)
    }
    //set badge indicator
    fun setBadge(pos:Int){
        binding.bottomBar.setBadge(pos)
    }
    //remove badge indicator
    fun removeBadge(pos:Int){
        binding.bottomBar.removeBadge(pos)
    }

    override fun onSupportNavigateUp(): Boolean {
        return navController.navigateUp() || super.onSupportNavigateUp()
    }
Result Demo:
Update [8th May, 2021]
Prior to the initial addition of this feature, you can now inflate separate menu items for the FastBottomNavigationBar and your Toolbar.
- Create the menu item you want to inflate in the
Toolbari.e.
<?xml version="1.0" encoding="utf-8"?>
<menu xmlns:android="http://schemas.android.com/apk/res/android">
    <item
        android:id="@+id/another_item_1"
        android:title="Another Item 1" />
    <item
        android:id="@+id/another_item_2"
        android:title="Another Item 2" />
    <item
        android:id="@+id/another_item_3"
        android:title="Another Item 3" />
</menu>
- Override
OnCreateOptionsMenuandonOptionsItemSelected(ensure it returnssuper.onOptionsItemSelected(item)). Now we have:
  class MainActivity : AppCompatActivity() {
    private lateinit var navController: NavController
    private lateinit var binding: ActivityMainBinding

    override fun onCreate(savedInstanceState: Bundle?) {
        super.onCreate(savedInstanceState)
        binding = ActivityMainBinding.inflate(layoutInflater)
        setContentView(binding.root)
        navController = findNavController(R.id.main_fragment)
        setupActionBarWithNavController(navController)
        setupSmoothBottomMenu()
    }

    override fun onCreateOptionsMenu(menu: Menu?): Boolean {
        menuInflater.inflate(R.menu.another_menu, menu)
        return true
    }

    override fun onOptionsItemSelected(item: MenuItem): Boolean {
        when (item.itemId) {
            R.id.another_item_1 -> {
                showToast("Another Menu Item 1 Selected")
            }

            R.id.another_item_2 -> {
                showToast("Another Menu Item 2 Selected")
            }

            R.id.another_item_3 -> {
                showToast("Another Menu Item 3 Selected")
            }
        }
        return super.onOptionsItemSelected(item)
    }


    private fun showToast(msg: String) {
        Toast.makeText(this, msg, Toast.LENGTH_SHORT).show()
    }

    private fun setupSmoothBottomMenu() {
        binding.bottomBar.setupWithNavController(navController)
    }

    //set an active fragment programmatically
    fun setSelectedItem(pos:Int){
        binding.bottomBar.setSelectedItem(pos)
    }
    //set badge indicator
    fun setBadge(pos:Int){
        binding.bottomBar.setBadge(pos)
    }
    //remove badge indicator
    fun removeBadge(pos:Int){
        binding.bottomBar.removeBadge(pos)
    }

    override fun onSupportNavigateUp(): Boolean {
        return navController.navigateUp() || super.onSupportNavigateUp()
    }
}
Select Bottom Item from any fragment
    buttonId.setOnClickListener {
        (requireActivity() as MainActivity).setSelectedItem(2)
    }
Result Demo:
Customization
<me.iaapteck.lib.FastBottomNavigationBar
        android:id="@+id/bottomBar"
        android:layout_width="match_parent"
        android:layout_height="70dp"
        app:menu=""
        app:backgroundColor=""
        app:indicatorColor=""
        app:indicatorRadius=""
        app:cornerRadius=""
        app:corners=""
        app:sideMargins=""
        app:itemPadding=""
        app:textColor=""
        app:badgeColor=""
        app:itemFontFamily=""
        app:textSize=""
        app:iconSize=""
        app:iconTint=""
        app:iconTintActive=""
        app:activeItem=""
        app:duration="" />
Setup
Follow me on Twitter @iAapTeck
//project label build.gradle
buildscript {
    repositories {
         ....
        maven { url 'https://jitpack.io' }
    }
}

allprojects {
    repositories {
     .......
        maven { url 'https://www.jitpack.io' }
    }
}
//app label build.gradle
dependencies {
        implementation 'com.github.iAapTeck:FastBottomNavigationBar:1.0.1'
}
Contributors ✨
|
|
 Sanjay Chintamani Patel
|
License
MIT License

Copyright (c) 2022-2023 iAapTeck Software Labs

Permission is hereby granted, free of charge, to any person obtaining a copy
of this software and associated documentation files (the "Software"), to deal
in the Software without restriction, including without limitation the rights
to use, copy, modify, merge, publish, distribute, sublicense, and/or sell
copies of the Software, and to permit persons to whom the Software is
furnished to do so, subject to the following conditions:

The above copyright notice and this permission notice shall be included in all
copies or substantial portions of the Software.

THE SOFTWARE IS PROVIDED "AS IS", WITHOUT WARRANTY OF ANY KIND, EXPRESS OR
IMPLIED, INCLUDING BUT NOT LIMITED TO THE WARRANTIES OF MERCHANTABILITY,
FITNESS FOR A PARTICULAR PURPOSE AND NONINFRINGEMENT. IN NO EVENT SHALL THE
AUTHORS OR COPYRIGHT HOLDERS BE LIABLE FOR ANY CLAIM, DAMAGES OR OTHER
LIABILITY, WHETHER IN AN ACTION OF CONTRACT, TORT OR OTHERWISE, ARISING FROM,
OUT OF OR IN CONNECTION WITH THE SOFTWARE OR THE USE OR OTHER DEALINGS IN THE
SOFTWARE.


