![]()
JsonBroadcaster
Update your app’s Ui State at runtime.
Motivation
Updating the Ui State at runtime is a very useful tool for quick drafts and validations. It also adds the benefit that it can be used by the whole testing team, be it developers, designers, quality assurance, etc.
It works both on the emulator or physical device (even with wifi debug).
How does it work
Android Debug Bridge (ABD) is used to send a broadcast signal to the desired application with a json payload as an extra.
adb shell am broadcast -p [package] -a [action] -e [extra key] [extra value]
On the application side there’s a BroadcastReceiver listening for theses payloads. If they are successfully deserialize a new state will be emitted and thus a Ui update.
Setup
For developers
-
Add the library dependency:
implementation("com.github.guilhe:json-broadcast-handler:${LATEST_VERSION}'") -
Your
UiStateclasses must be annotated withkotlinx.serialization.Serializable(dependency):@Serializable data class UiState(val memberA: String, val memberB: String)
-
Create a
BroadcastUiModelHostimplementation to listen for state updates, as shown bellow:private val host = object : BroadcastUiModelHost<UiState>(coroutineScope, UiState.serializer()) { override fun updateState(new: UiState) { //... } }
-
Add it where it fits best in your project, examples:
If you are using
androidx.lifecycle.ViewModelyou can do the following:class MatchViewModel : ViewModel() { private val _uiState = MutableStateFlow(MatchUiState(home = Team("PRT", "??"), away = Team("BRA", "??"))) val uiState: StateFlow<MatchUiState> = _uiState private val host = object : BroadcastUiModelHost<MatchUiState>(viewModelScope, MatchUiState.serializer()) { override fun updateState(new: MatchUiState) { _uiState.update { new } } } }
But actually you don’t need a
ViewModel, you can simply use a@Composablefor instance:@Composable fun MatchScreen() { var uiState: MatchUiState by remember { mutableStateOf(MatchUiState(home = Team("PRT", "??"), away = Team("BRA", "??"))) } LaunchedEffect(Unit) { val host = object : BroadcastUiModelHost<MatchUiState>(this, MatchUiState.serializer()) { override fun updateState(new: MatchUiState) { uiState = new } } } Match(uiState) }
And the beauty of it is that you may choose whatever suits you best:
ViewModel,@Composable,Activity,Fragment, etc… -
To disable it, for instance in release builds, override the
receiverdeclaration in theAndroidManifestby adding amanifestPlaceholdersproperty in thebuild.gradle:android { buildTypes { getByName("release") { manifestPlaceholders["enableJsonBroadcastReceiver"] = false } getByName("debug") { manifestPlaceholders["enableJsonBroadcastReceiver"] = true } } }<receiver android:name="com.broadcast.handler.JsonBroadcasterReceiver" android:exported="${enableJsonBroadcastReceiver}" tools:replace="android:exported"> <intent-filter> <action android:name="JsonBroadcaster.extra" /> </intent-filter> </receiver>

For the testing team
- Google’s Android SDK must be installed in order to use command line tools;
- Use the desktopApp GUI;
- Ask for the
applicationIdvalue and an installed version of the app.
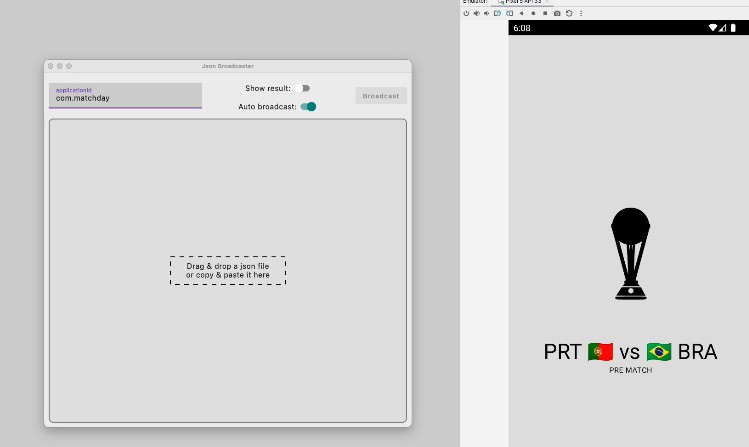
Desktop app
Although we can use the terminal to send broadcast commands, it’s not practical. The desktopApp provides a simple user interface to help us with that task.
To run it you can either:
- Clone this project and type
./gradlew :desktopApp:runin the terminal; - Download a
.dmg(only MacOS for now) and install it. Get it here.
note: due to security reasons, since this app is not from an Identified Developer, MacOS will block its execution. To by pass it you’ll need to click in “Open Anyway” in System Settings under Security. It’s only needed once:

(This wont happen with the first approach)
Sample app
Inside the sample module you’ll find a playground app ready for you to test it.
To run it you can either:
- Clone this project and type
./gradlew :androidApp:installDebugin the terminal; - Download the sample
.apkand install it. Get it here.
The applicationId is com.matchday and you can use the following payload to get you started:
{
   "home":{
      "country":"PRT",
      "flag":"??"
   },
   "away":{
      "country":"BRA",
      "flag":"??"
   },
   "homeGoals":0,
   "awayGoals":0,
   "started": false,
   "running": false,
   "finished": false
}
Demo
demo.mov
LICENSE
Copyright (c) 2022-present GuilhE
Licensed under the Apache License, Version 2.0 (the “License”); you may not use this file except in compliance with the License. You may obtain a copy of the License at
http://www.apache.org/licenses/LICENSE-2.0
Unless required by applicable law or agreed to in writing, software distributed under the License is distributed on an “AS IS” BASIS, WITHOUT WARRANTIES OR CONDITIONS OF ANY KIND, either express or implied. See the License for the specific language governing permissions and limitations under the License.