Android WebSocket Client With Kotlin.
Web Socket Clinet Side For Android With Kotlin you can use this app with Ktor Server Side, Find Ktor Project Here: Ktor WebSocket Server Side
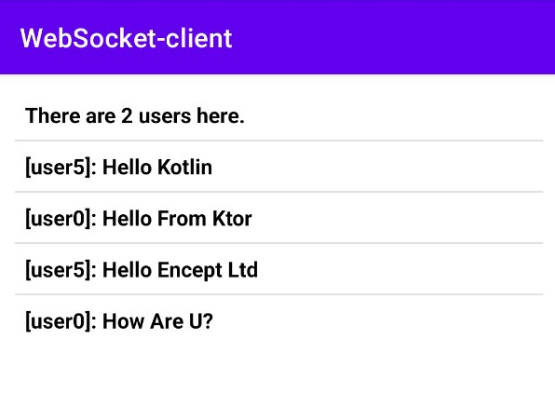
App Preview

Usage
add this line into your build.gradle app.
dependencies {
    implementation 'org.java-websocket:Java-WebSocket:1.4.0'
}
Add This Code In MainActivity
import android.os.Bundle
import android.view.LayoutInflater
import android.view.View
import android.view.ViewGroup
import android.widget.*
import androidx.appcompat.app.AppCompatActivity
import com.encept.websocket_client.databinding.ActivityMainBinding
import java.net.URI
import java.util.*


class MainActivity : AppCompatActivity() {

    private lateinit var binding: ActivityMainBinding
    private lateinit var webSocketClient: ChatWebSocketClient
    private var AL: ArrayList<HashMap<String, Any>> = ArrayList()

    override fun onCreate(savedInstanceState: Bundle?) {
        super.onCreate(savedInstanceState)
        binding = ActivityMainBinding.inflate(layoutInflater)
        setContentView(binding.root)

        val btnSend = binding.btnSend
        val editMsg = binding.editMsg
        val listview1 = binding.listview1

        // load server url from strings.xml
        val serverUri = URI(getString(R.string.server_url))

        webSocketClient = ChatWebSocketClient(serverUri) { message ->
            // display incoming message in ListView
            runOnUiThread {
                run {
                    val _item = HashMap<String, Any>()
                    _item["message"] = message
                    AL.add(_item)
                }
                listview1.adapter = Listview1Adapter(AL)
            }
        }
        // connect to websocket server
        webSocketClient.connect()


        btnSend.setOnClickListener {
            try {
                // send message to websocket server
                webSocketClient.sendMessage(editMsg.text.toString())
                editMsg.setText("")
            } catch (e: Exception) {
                e.printStackTrace()
                Toast.makeText(this, e.toString(), Toast.LENGTH_SHORT).show()
            }
        }
    }

    override fun onDestroy() {
        super.onDestroy()
        // close websocket connection
        webSocketClient.close()
    }


    class Listview1Adapter(private val _data: ArrayList<HashMap<String, Any>>) : BaseAdapter() {
        override fun getCount(): Int {
            return _data.size
        }

        override fun getItem(_index: Int): HashMap<String, Any> {
            return _data[_index]
        }

        override fun getItemId(_index: Int): Long {
            return _index.toLong()
        }

        override fun getView(_position: Int, _v: View?, _container: ViewGroup?): View? {
            val _inflater = LayoutInflater.from(_container?.context)
            var _view = _v
            if (_view == null) {
                _view = _inflater.inflate(R.layout.cul, _container, false)
            }

            val text2 = _view?.findViewById<TextView>(R.id.text2)

            if (text2 != null) {
                text2.text = _data[_position]["message"].toString()
            }

            return _view
        }

    }

}
then, add this code at activity_main.xml
<?xml version="1.0" encoding="utf-8"?>
<LinearLayout xmlns:android="http://schemas.android.com/apk/res/android"
  xmlns:tools="http://schemas.android.com/tools"
  android:layout_width="match_parent"
  android:layout_height="match_parent"
  android:orientation="vertical">

  <LinearLayout
      android:id="@+id/linear2"
      android:layout_width="wrap_content"
      android:layout_height="0dp"
      android:layout_weight="1"
      android:orientation="vertical"
      android:padding="4dp">

      <ListView
          android:id="@+id/listview1"
          android:layout_width="match_parent"
          android:layout_height="wrap_content"
          android:choiceMode="none"
          android:padding="8dp"/>
  </LinearLayout>

  <LinearLayout
      android:id="@+id/linear1"
      android:layout_width="match_parent"
      android:layout_height="wrap_content"
      android:orientation="horizontal"
      android:padding="2dp">

      <EditText
          android:id="@+id/edit_msg"
          android:layout_width="0dp"
          android:layout_height="wrap_content"
          android:layout_weight="1"
          android:hint="@string/enter_message"
          android:importantForAutofill="no"
          android:padding="8dp"
          android:textColor="#000000"
          android:textColorHint="#607D8B"
          android:textSize="12sp"
          tools:ignore="TextFields" />

      <Button
          android:id="@+id/btnSend"
          android:layout_width="wrap_content"
          android:layout_height="wrap_content"
          android:padding="8dp"
          android:text="@string/send"
          android:textColor="#FFFFFF"
          android:textSize="16sp" />
</LinearLayout>
now we need to create listview custom view, create new xml called custom.xml and add this code
<?xml version="1.0" encoding="utf-8"?>
<LinearLayout xmlns:android="http://schemas.android.com/apk/res/android"
    xmlns:tools="http://schemas.android.com/tools"
    android:layout_width="match_parent"
    android:layout_height="match_parent"
    android:orientation="vertical">

    <LinearLayout
        android:layout_width="match_parent"
        android:layout_height="wrap_content"
        android:padding="8dp"
        android:orientation="horizontal"
        tools:ignore="UselessParent">

        <TextView
            android:id="@+id/text2"
            android:layout_width="wrap_content"
            android:layout_height="wrap_content"
            android:text="text"
            android:textSize="16sp"
            android:textStyle="bold"
            android:textColor="#000000"/>
    </LinearLayout>

</LinearLayout>
after that, Create Kotlin Class Called ChatWebSocketClient
import org.java_websocket.client.WebSocketClient
import org.java_websocket.handshake.ServerHandshake
import java.net.URI

// initialize websocket client
class ChatWebSocketClient(serverUri: URI, private val messageListener: (String) -> Unit) : WebSocketClient(serverUri) {

    override fun onOpen(handshakedata: ServerHandshake?) {
        // When WebSocket connection opened
    }

    override fun onClose(code: Int, reason: String?, remote: Boolean) {
        // When WebSocket connection closed
    }

    override fun onMessage(message: String?) {
        // When Receive a message
        messageListener.invoke(message ?: "")
    }

    override fun onError(ex: Exception?) {
        // When An error occurred
    }

    fun sendMessage(message: String) {
        send(message)
    }
}
Features
- Realtime Message with 40ms ping.
- 100% Kotlin Code On Client Side & Server Side.
- Source Code Is Compatible with any IDE
- Clean & Simple Code
License
- All Copyright Saved By Jetbrains.
- Apache License