Android Open-Source Telematics App with Firebase© integration

Description
This Telematics App is developed by Damoov and is distributed free of charge. This app can be used to create your own telematics app for Android in few steps.
Ready Features
Telematics:
- Telematics SDK – mobile telematics engine.
Screens:
- Dashboard
- Feed
- Trip Details
- Leaderboard
- My Rewards
Basic concepts & credentials
-
Create an account https://app.damoov.com/user/registration and get
InstanceIdandInstanceKeyauth keys to work with the telematics SDK & APIs.
How to obtain InsanceId & InstanceKey => https://docs.telematicssdk.com/docs/datahub -
Additionally, to authenticate users in your app and store users data, you need to create a firebase account: https://firebase.google.com
All user data will be stored in the Firebase© Realtime Database, which will allow you to create an app users database without programming skills.
Setting Up
Here you can find a short video guide, how to launch Android Open-Source Telematics app:

Setup Firebase© Project
Step 1: After creating your Firebase© account, open your console: https://console.firebase.google.com
Click “Create a project” button.

Step 2: Enter the name of your future Project. Click “Continue” button.

Step 3: For ease of integration, at the next step, we recommend deactivating the “Enable Google Analytics” checkbox.

Click “Create project”.
Step 4: Now you need to create a configuration for your Android app. Click on the “Android” as it us shown on the picture below:

Step 5: Enter your Android Package Name. Enter the SHA-1 key, this identifier must be used in your application in Android Studio. Click “Register app” then.

Step 6: To connect your Firebase you need to add the google-services.json file to project_directory\app. Final file path: project_directory\app\google-services.json

Step 7: You can skip the “Add Firebase SDK” & “Add initialization code” steps below, because we already did it for you in our Telematics App:) Finish the setup and click on “Continue to console”.

Step 8: Important. In order for your users to create accounts to log into your app, you need to go to “Authentication” section on the left side of the menu.

Step 9: In the “Sign-in method” tab, click on the Provider’s “Email/Password” on the right “pencil” (Edit configuration hint) as in the picture below. If you need to perform authorization using the “Phone” Provider – select the setting of this item.

Step 10: Switch to “Enable” and click “Save” button. Now your users can login to the app.

Step 11: We need to activate Firebase© Realtime Database. This will allow you to store the data of all your users in this simple web interface. Go to the Realtime Database section on the left side of the menu and click on the “Create Database” button.

Step 12: Choose any Realtime Database location value.

Step 13: Select “Start a locked mode” and click the “Enable” button.

Step 14: Now you need to change rules for your Realtime Database. You need to go to “Realtime Database” section on the left side of the menu. In the “Rules” tab change read and write fields to “auth.uid != null”.

Step 15: Open our TelematicsApp in Android Studio, make sure to transfer the google-services.json file to project_directory\app (See Step 5 above) and Enjoy!
Build & Run!
Setup TelematicsApp Configuration
In file AppConfig.kt you can specify the basic settings for your app.
To use your unique applicationId for your application, change applicationIdPrefix and name:
const val applicationIdPrefix = “com.your_application_prefix”
private const val name = “your_application_name”
To work with our API use InstanceId and InstanceKey from https://app.damoov.com/user/registration :
const val INSTANCE_ID_PROD = “YOUR_INSTANCE_ID”
const val INSTANCE_KEY_PROD = “YOUR_INSTANCE_KEY”
To set application label change app_name in strings.xml in content module:
YOUR_LABEL
To set Privacy Policy change PRIVACY_POLICY in AppConfig.kt file :
const val PRIVACY_POLICY = “YOUR_PRIVACY_POLICY_LINK” //for example “https://www.telematicssdk.com/privacy-policy/“
To set Terms Of Use change PRIVACY_POLICY in AppConfig.kt file :
const val TERMS_OF_USE = “YOUR_TERMS_OF_USE_LINK” //for example”https://www.telematicssdk.com/privacy-policy/“
To set application icon, find the content module icon in resource folders (res/mipmap, res/mipmap-hdpi, etc.) and replace it. And for change background icon color set ic_launcher_background in color.xml:
#your_color
Telematics SDK Setup
We are using the Gradle auto build system.
The Telematics SDK is installed automatically in the Telematics app. After downloading this application for the first time, you need to run the Sync Project with Gradle Files command. This will install the required dependency libraries for the application to function properly. To upgrade the Telematics SDK version, go to the Versions file ( module: buildSrc) and change the const val trackingApi parameter. This repository will always use the current version of the Telematics SDK.
Telematics SDK | Permission Wizard
An important part to record user’s trips is to properly request permissions to use the user’s Location and Motion & Fitness activity. Telematics SDK includes a specially designed Wizard that helps the user explain why the application needs it and make the right choice.
Note: this wizard is fully cutomizable, you can find the documentation here: https://docs.telematicssdk.com/docs/android-sdk-integration
For use your own icon to the notification, place your own icons to res/drawable (module: content) folders with the following names: ic_tracking_sdk_status_bar.png, ic_tracking_sdk_notification.png.
For change Wizard next button background color you need edit layout_telematics_wizard_page.xml (modile: data).
LoginAuthFramework Authentication
We have created a special Framework that allows you to receive deviceToken, jwToken & refreshToken for full integration with our services. These keys are required to make calls to our APIs.
LoginAuth Framework is already integrated into this Telematics App. After downloading this application for the first time, you need to run the Sync Project with Gradle Files command. This will install the required dependency libraries for the application to function properly. To upgrade the Telematics SDK version, go to the Versions file ( module: buildSrc) and change the const val loginAuthFramework parameter. This repository will always use the current version of the LoginAuthFramework.
You can find complete information about LoginAuth Framework in our repository https://github.com/Mobile-Telematics/LoginAuthFramework-Android
Get HERE Maps access keys
In the next few simple steps, we’ll show you how easy it is to create access keys in the HERE developer console.
Step 1: After creating your HERE account, open your project in https://developer.here.com/projects
In the REST table click “Generate App”.

Step 2: Click “Create API key”

Step 3: Copy API KEY and paste it to HERE_API_KEY parameter in AppConfig.kt file

Step 4: In HERE SDK FOR ANDROID table click “Generate App ID and App Code”.

Step 5: Input your applicationId like a “com.prefix.application_name” from AppConfig.kt file for connecting your application and HERE Maps services. Then click “GENERATE”.

Step 6: Copy LICENSE KEY from HERE developer console to HERE_LICENSE_KEY parameter in AppConfig.kt file. Also do the same for parameters: APP ID and APP CODE.

Note: you do not need to Download SDK from the HERE developer console, it is already in the application project.
Screens
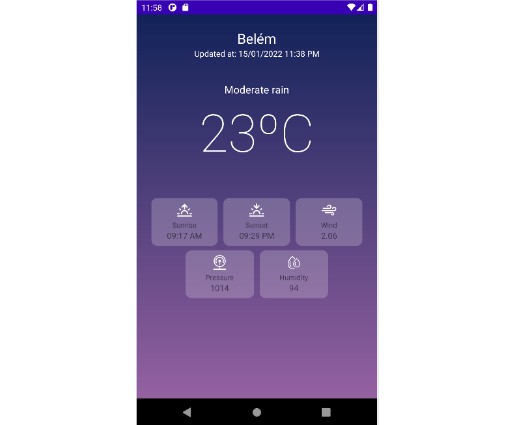
Dashboard
Our goal is to provide your users with a user-friendly interface to get the best user experience.
To get the first data, user usually needs to drive a short distance. We set this parameter in the configuration file AppConfig.kt in parameter
const val DASHBOARD_DISTANCE_LIMIT = “10” //measured in km
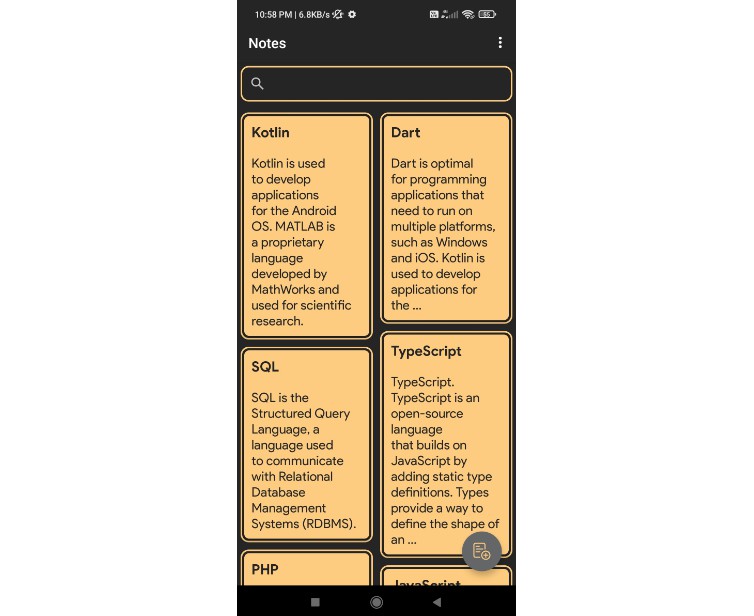
Feed
The Trips screen displays the trips users have made.
Feed | Type of transport
The Telematics SDK allows users to change their role for any trip.
Use the following string values below!
- OriginalDriver
- Passenger
- Bus
- Motorcycle
- Train
- Taxi
- Bicycle
- Other
Feed | Tags
Depending on your product use cases, you can also use our Tags feature. You can learn more about it here: https://docs.telematicssdk.com/docs/tags
We also offer you a convenient interface for switching certain tags for each trip.
The Telematics SDK allows users to add specific uniquetags to any ride for ease of use.
For example, by adding tag options to any trip, you will be able to mark specific trips for Business/Personal or other options.
NOTE: you can use DEL tag and hide the trips marked by it in the app. These trips will be shown in DataHub on List of Trips page with a special mark that these trips were hidden in the app.
Trip Details
To set API KEY for HERE Maps change HERE_API_KEY in the AppConfig.kt file.
const val HERE_API_KEY = “YOUR_HERE_API_KEY”
To set LICENSE KEY for HERE Maps change HERE_LICENSE_KEY in the AppConfig.kt file.
const val HERE_LICENSE_KEY = “YOUR_HERE_LICENSE_KEY”
To set APP ID for HERE Maps change HERE_APP_ID in the AppConfig.kt file.
const val HERE_APP_ID = “YOUR_HERE_APP_ID”
To set APP CODE for HERE Maps change HERE_APP_CODE in the AppConfig.kt file.
const val HERE_APP_CODE = “YOUR_HERE_APP_CODE”
Having received a list of the user’s trips, you can refer to your array of trips and get more detailed information, as well as a set of points to be displayed on the HERE Maps API.
Leaderboard
You can learn more about these services by following to our docs:
https://docs.telematicssdk.com/docs/leaderboards
All 9 types of Leaderboard are presented in the Telematics App and you can figure out which of these options you actually need.
Note! Only users who have trips during latest 14 days participate in Leaderboard. Use placeholders for new and lost users.
My Rewards
Our telematics app allows you to work with DriveCoins and Streaks for each user:
You can learn more about these services by following to our docs:
DriveCoins – https://docs.telematicssdk.com/docs/drivecoins
Streaks – https://docs.telematicssdk.com/docs/streaks-1
In detail, you can see the work with methods for rewards in the Telematics App source code in the DriveCoins section.
User Log Out
In the Telematics App source code, we show you an option to clear user data after logging out. Do not forget – to stop tracking and record user trips, you need to explicitly delete VIRTUAL_DEVICE_TOKEN.
This can be done using Telematics SDK method:
trackingApi.setEnableSdk(false) //disable SDK
trackingApi.clearDeviceID() //Clear DeviceToken
You can also disable Telematics SDK with the trips uploading to upload already recorded and stored on the device trips to Damoov platform.
Learn more about available SDK methods here: https://docs.telematicssdk.com/docs/methods-for-android-app
Connect OBD device
Telematics App provides you with the optional functionality to connect the app with an OBD vehicle adapter using Bluetooth® technology.
OBD adapter is a small device that plugs into the CAN-port of your car.
Telematics App created by Damoov, has a full range of functionality that allows you to read almost any information and indicators from your vehicle, and add it to trips recorded by the Telematics App on iOS/Android.
Connecting and disconnecting to your Android device happens automatically. OBD adapter can detect accidents.
Detailed documentation and the basic principles of operation can be found in the development portal https://docs.telematicssdk.com/docs/bluetooth-obd
To fully work with this functionality, you need additional equipment, which we can provide upon your request.
Links
Official API services web-page
Official ZenRoad app for Android
Official ZenRoad app for Huawei