Codewif
Codewif is an Android library framework to allow you to perform in-app testing of Android apps and libraries. It offers the following benefits over the traditional way of testing apps:
✓ No need for JUnit, Espresso, UI Automator, instrumentation testing, Mokito, Robolectric...
✓ UIs are tested by taking screen snapshots and comparing them to previous snapshots.
✓ Execute multiple tests asynchronously, run them synchronously or use a mixture.
✓ Eliminates the need for dependency injection. Say goodbye to Dagger and Koin.
✓ Test code is integrated into your app through build variants and excluded during release builds.
✓ Mocked classes and functions are done on separate git branches.
✓ Integrates into your Continuous Integration (CI) server to report test results.
✓ Extremely fast testing.
✓ The Codewif framework is built with Kotlin and makes extensive use of coroutines.
✓ Non-developers (testers) can run tests without needing Android Studio.
✓ Easy to use.
In-App Testing
The most fundamental change that Codewif brings to developers is integrating test code into your app during testing phases. Instead of test modules residing in folders such as androidTest or unit tests residing in the Java test folder, your test code is part of your app's runtime code. Your test code is kept separate from your production code by means of Android's build variants.
The general flow of developing and testing an app using Codewif works as follows:
- You code a feature in your app.
- You create either a unit test or a UI unit test using Codewif's framework library.
- To run your test, you select your build variant that is setup for testing and run your app.
- When your app starts, you can either run the tests manually from Codewif's built-in UI or have them executed automatically.
- When testing has completed, you can view the results in Codewif's UI, view them in Android's Log or have them automatically sent to Codewif's backend where you can view them as a report, or have the test results sent to your CI server.
UI Testing With Screenshot Comparisons
One of the reasons why a lot of developers hate writing test code is due to the amount of code that needs to be written to test whether a user interface is displaying its content as expected. Android's Espresso framework, used for the so-called instrumentation testing, has a learning curve but is also slow.
Codewif takes a completely different approach to UI testing. It treats a UI similar to the way git treats code changes. Just as in git, changes to code are detected by comparing hashcodes of previous code versions to their current version, Codewif generates a hashcode of your app's entire screen image and compares it to a previous hashcode of the screen. If the hashcodes are not the same, the screens are considered different. The main benefit behind this approach is that it is incredibly fast and provides an actual visual presentation of the previous snapshot compared to the current snapshot allowing you to manually compare the two to see where the differences are. If even so much as a single pixel doesn't match up between the two snapshots, the test fails. Sometimes the change may be very obvious, such as changing a text size or color or repositioning an element. Other times it may be less obvious such as adding a bit more padding or changing a color only ever slightly. When a UI test in Codewif fails, after you inspect and compare the previous snapshot to the current one, you can decide whether the changes from the previous snapshot are valid and decide whether you would like to make the current snapshot your "good" or "expected" result for future testing.
In the current version of Codewif, snapshot images are stored on the device being tested. But a backend service is currently being developed that will allow you to store these snapshot images in the cloud. This of course is optional. You will have the option of storing the snapshot image along with its hashcode on Codewif's backend, choose to store only the hashcode, or store nothing. Once a snapshot and its hashcode is stored on the backend, other developers who want to run the tests on their own devices can easily detect any changes that occur due to any code changes that they may have made in their production code. In this sense, Codewif acts like an extension to git by providing a UI version control to let developers know when their locally tested UI doesn't match up with the version stored on the backend. But to use this, you must at the very minimum allow the hashcode for the UI to be stored on the backend. If you do choose to store only the hashcode and a UI test fails, you will have to investigate further to determine what the actual differences are between the previous and curent snapshots as you would not have any access to the previous snapshots.
Codewif's backend also tracks physical parameters of your device's screen in oder to properly cache the snapshot. For instance, the number of pixels for the screen's width and height as well as the dpi of the device are recorded. This allows you to run the same UI tests on diverse devices that have the same properties and generate a single snapshot image for all of them. If two devices do not share the same properties, a separate snapshot is stored for each.
The Elimination of Dependency Injection
Unless you have a very compelling reason to use dependency injection (DI), you should avoid using it. DI, and Dagger in particular, overly complicates your code, is prone to adding unnecessary bugs and provides little and in most cases no benefit to most apps.
If you are using DI primarily to mock out classes and functions, you can achieve a simpler and cleaner solution by placing mocked classes on a separate test branch. When you checkout a test branch, you merge your development branch into your test branch and replace code in those classes that you want to mock out with your mocked code. You never merge from a test branch back into a development branch. Merging is only done in one direction - from development to testing.
In the event that you have merge conflicts, you will hae to manually fix these conflicts.
Even if your app already uses Dagger or Koin, you can still keep it and mock out any modules you want. But if you are just starting on a new app and have no compelling reason to use DI, then you instantiate all your objects in your classes as you normally would. There is no need to pass in an instantiated class through a constructor parameter unless you have a reason to do so.
If you are an organisation that uses Dagger or Koin extensively but almost never writes test code, you should seriously consider how much more valuable it is if you eliminate it and instead invest that same amount of time writing test code using Codewif. The benefits should not be underestimated. In a large application where little or no test code exists, changes by one developer to the codebase can have bad side effects on other portions of code and you would not notice this unless the app was thoroughly tested manually.
Using git branches for mocking isn't something specific or unique to Codewif. You can do this even with standard testing. But since Codewif makes use of build variants, using a build variant for a specific git branch can help produce highly streamlined testing scenarios.
Codewif Components
Codewif for Android consists of two separate components: The Codewif Framework Library and the Codewif Service App
If you are doing any UI testing or you want to send test results to the backend, you need the Codewif Service App which must be installed on to the device being
tested.
Codewif Framework Library
This is an Android library (AAR). It is used to setup and run tests. The library also contains a UI component that by default is shown when tests are run. It allows you to see all the tests that are defined, view the test results and compare snapshot images for UI tests. It also has functionality to let you send the test results to Codewif's backend or to your own backend server. You can also selectively run tests and exclude tests. Each test that you define can be run synchronously or asynchronously. When a test runs synchronously, it blocks all other tests following it until it completes. An asynchronous test on the other hand is non-blocking. UI tests are always run synchronously. In many cases, it is a time saver to run non-UI tests (so-called "unit tests") asynchronously. But there are many cases even with unit tests where one test is dependent on being carried out before another one begins.
The following animation shows Codewif's UI running a bunch of tests. The first test is a UI test of the main activity. First the list of tests are shown. Testing is started manually by clicking on the Run button. The main activity is then shown briefly and then the test results screen is shown. The test on the main activity shows that it failed. When you click on it, you are taken to the test result details where you see a snapshot of the current activity, which in this demo is a login screen. You can then scroll to the bottom and then use the slider to make the previous snapshot gradually fade in. As it fades in, the previous snapshot is overlayed on top of the previous snapshot to make it easier to see where any difference are:
Codewif Service App
The Codewif Service app is an Android app that the framework library interacts with. It provides the following functionality:
- Store a screenshot and its hashcode and return these to the framework library when testing is carried out.
- Communicates with the backend servers to send test results
The current version of the Codewif Service app stores screen snapshots to the device's SD card but as was previously mentioned, as soon as Codewif's backend service is available, screenshots can be stored there in order to allow better collaboration among testers as well as the use of diverse testing devices.
Snapshot images are stored on a device's SD card under the folder:
/sdcard/Codewif/[project_id]/snapshots/
where project_id is the id you assign to your project during the test setup. Because this is stored on the sd card, the files remain there even if you uninstall the Codewif Service app. Also, deleting the Codewif Service app's cache does not delete these files. The reason why these files are stored on the sd card is because the framework library also stores its screen snapshots there before handing them over the Codewif Service app. The sd card acts as a mutual storage place for both the framework library and the service app, avoiding the need to transfer large amounts of image data between the two. Should you find a need to reinstall the service app, you might want to delete all the data under /sdcard/Codewif to be sure you have a clean install.
By handling the storage of images and communicating with the backend, the service app can persist your test data even when your app is terminated or uninstalled.
If the Codewif Framework detects that you need to use the Codewif Service, it checks to see if it is installed. If it's installed, it will automatically start it if it's not already running. If it's not installed, you will be prompted to install it. When you press on the OK button in the prompt dialog, you are taken to the app in Google Play where you can download it. Of course, the source code for it is also part of this project, so you can also compile it and install it manually if you need to.
Setting Up Your Test Environment
Setting up your test environment to use Codewif consists of the following steps:
- Modifying your gradle files
- Creating folders for test code.
- Creating a stub file in other build variants to mock out the code that launches Codewif.
- Launching Codewif.
- Setting up tests.
The instructions that follow assume that you want to test an Android app. If however you have an Android library that you want to test, the instructions are the same except that you will need to add an activity module to your project that is used to launch Codewif. In this case, the instructions below apply to your activity module and not to your library module.
1. Modifying Your Gradle Files
For detailed information on creating build variants for Android, see:
https://developer.android.com/studio/build/build-variants
The Codewif Framework Library is hosted on Jitpack's maven repository, so in your root build.gradle file, you need to add the following:
If your build.gradle file already has a maven reference to some other repository, you can add another one. Each repository must be listed inside its own curly
braces. Example:
You need to modify your app's build.gradle file to setup a flavor for testing. (Note: If you are testing a library, you make these changes to the build.gradle file that is associated with the activity module that you use to test your library).
The following build.gradle file illustrates a build variant for testing using a flavor called codewif:
Do not give your variant a name that starts with test as that is reserved by Android for its own testing purposes.
The entry for the Codewif dependency is created by taking the flavor name that you created for testing (here codewif) and appending the word Implementation after it. When you create a dependency using the flavor name, the dependency is only included in your build when the build variant is selected. This is necessary to avoid the release version of your app from including Codewif.
If your app is currently not using coroutines, make sure to add the dependency:
Codewif also depends on Java 1.8, so make sure you have the following:
2. Creating Folders For Test Code
After you have modified your build.gradle file to create a flavor for testing, you can create the folders that will be used to contain your test code. While you can create these folders manually, it is safer if you use Android Studio's assistant to create them for you. To launch the assistant, in the project pane, right click on the app module, and select New > Folder > Java Folder. From the dialog, select the flavor from the Target Source Set where you want the folder to be created. Select the flavor that corresponds to the test flavor you created in build.gradle and then press Finish.
If your project wasn't using flavors, you need to create at least one more additional flavor. This is needed because when you select a build variant to build with, Android Studio combines all the code in your main folder with all the code in the folder that corresponds to your selected build variant. Later we will show how to launch Codewif from your activity. But when you want to build a variant of your app that is not the test variant, the code that launches Codewif needs to be swapped out with a stub file. In order for that to work, the stub file cannot be part of your main folder. It must reside in all of the folders that correspond to the other build variants. In this example app, we have three build variants: demo, full and codewif
The folders for these three variants looks like this:
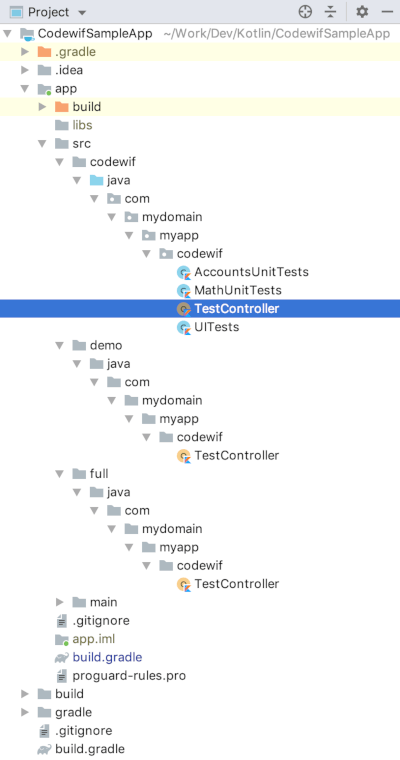
The class used to launch the tests is called TestController. The version under the codewif variant is the one that will launch Codewif, while the ones under demo and full are only stub files.
3. Creating a Stub File
Although you can name and place the stub file anywhere in your project where it makes sense, it is recommended that you call it TestController and place it in a package called codewif. If all developers do this, it will promote consistency. This is what your stub file should look like:
TestController.kt
4. Setting Up Tests
Although there is no fixed rule on where you place your test code, it is recommended that you place it in the same folder where your TestController class is located. You should however organize your tests in a way that makes sense. One strategy is to separate unit testing from UI testing, so a folder called unitTesting and another one called uiTesting would be good choices.
You should also separate your tests by related groups. For example, if you are doing unit testing and have utility classes for strings, dates, math, etc., you should create separate test classes for each of these.
Create a test class that inherits from TestSetup. Here is an example of a test class that performs unit tests on math utility functions:
Each test is added using the addTest method which takes a UnitTest object. The UnitTest object's constructor takes a name parameter that you use to provide a human readable text to identify your test. The text you provide can only be used once per package name. You cannot have the same test name appear more than once in the same package. You can however re-use the name if the package name for the class combined with the class name is different. Internally, Codewif generates a unique id based on the package name + class name + test name. The order in which you add tests is the order in which they are executed.
If you have a test that takes a long time to run and only want to start the test manually by clicking on it in Codewif's UI, you can set the skipTest parameter to true, as is shown for the "Position in PI is even" test.
You must also decide how you want to run a test. You can run it either synchronously or asynchronously. If a certain test requires that the app is in some state before the test can be carried out and other tests are run prior to reaching that state, you should set those prior tests to run synchronously. For example, if your app needs to retrieve data from a backend and test that it meets some condition before performing any further tests with the data, you would run your data retrieval test synchronously.
You use the testToRunSync method if you want to run the test synchronously and use the testToRunAsync if you want it to run asynchronously.
When you run an asynchronous test, your test is provided with a callback parameter. Your test must call the callback by executing the invoke method as shown in the example above.
UI Tests
This is a class to performs a number of UI tests:
To create a UI test, use the uiTestToRun method. In your test implementation, you write whatever code is necessary to navigate to the screen you want to test. You may also need to add code that does things like scrolling your screen to some position, enabling or disabling checkboxes, entering text into EditText fields and so on. After you have setup your UI to the state that you want it tested in, you should add a delay as the last thing before returning. How much of a delay you need depends on how long it takes for your UI to appear in a stable state. You can try using a 1 second delay. If the test fails because the UI needs more time to stabilize, you can increase the value. Keep in mind that different devices with different processing speeds may require more time, so make sure you have enough delay to cover all the devices you are testing on.
It should also be noted that although you can set the skiptTest parameter to true to skip a UI test, you should avoid this. In many cases, a UI test (other than the first one) will usually require that previous tests be carried out first. If you skip a test, the app's state may not be set correctly and tests will fail after the skipped test. Normally you write UI tests in such a way that when one test has completed, you only add additional code to take you to the next UI state. It's usually a lot more work to create a completely independent UI test that can get your app to a particular state to be tested in. One exception to this is when you open a new activity, which almost always results in an initial starting point. Because most of your UI tests are dependent on previous tests, you will not likely be able to click on a single test on the Test screen and see it pass. It will almost always fail.
If your test needs to have a reference to the current activity being displayed, you can use:
TestRunner.getCurrentActivity()
Codewif tracks which activities are created and destroyed and which on is currently being displayed. Of course, if your app is an Android app being tested, you can use your own code if it provides access to the activities that you are testing.
If you have alert dialogs or other components that appear as a modal view and if you want to test them, your code will have to make public functions or properties available that will allow your test code to access them. In traditional code, references to alert dialogs are usually internal and kept private, so this makes it impossible to access them. If you are building a new app and want to test for these modal components, you should consider providing public methods that allow your code to access them. In Kotlin, if you want to make these methods publicly accessible to your test code, you can use the internal keyword on a method that returns a reference to the component, provided that your test code is part of the same module. If your app is not an Android library, you probably are better off just making these methods public for test purposes.
Once you have the screen in the state you want to have it tested in, you simply return. Upon returning, Codewif will automatically take a screenshot of your app's screen and then compare it with the previous snapshot (if one exists). If no previous snapshot of the screen exists for the test, the test will be considered to have passed.
It should be noted that a screen snapshot does not include Android's status bar at the top of the screen (where notifications are shown as well as the clock and battery status). Even if this were possible to include this in the snapshot, your test would always fail because some of the things on the status bar change over time including the clock and battery level.
If the UI that you are testing contains any kind of animation, you will not be able to test it as it would be highly unlikely that you could get the exact same snapshot each time. In addition to animations, you need to take care of elements like the EditText field where a cursor can flash when the input field has focus. The test will usually fail because there is no guarantee that the flashing cursor will be visible or not visible at the moment that snapshot is taken. To get around this, it is suggested that you either prevent the field from having focus when the screen is shown. You can either do this permanently in your production code, or add some code in your test to temporarily remove the focus. The easiest way to remove focus from an EditText field when an activity is shown is to set focusableInTouchMode to true in the EditText's parent container. For example:
Handling Test Exceptions
If your test encounters an unhandled exception, Codewif will catch this and include the exception's message information in the details field, which is a property of the TestResult class. Even if your test succeeds, you can use the details property and put any text in it that you want. This text will show up in Codewif's UI when you view the test results for the test. It will also be included if you export your tests to JSON data or send it to the backend. You might want to use this feature in the event that you want to report internal data or state information to provide more context about a test. This might be useful by providing more context to others who might be running your tests.
Managing a Large Number of Tests
If you have a large project with a lot of tests, you might want to consider breaking up the tests into multiple files. If for example, you were testing a math utility class that had 100 methods, you might consider placing 50 of the tests in one file and the remaining in another. In some rare cases, you may need to do this. If you were running 100 tests on a device that had very little memory and your tests use up a lot of memory or other resources, the app may crash or be terminated by Android if it runs out of memory. Codewif is designed to let your test class be garbage collected as soon as the last test in the class has completed.
Configuring a TestController
Now that you have your test classes, you need to add them to your test controller class. In the TestController class you add references to your test classes using the addTestSetups method of the TestRunner object. Here is an example:
The addTestSetups method takes one or more references to your test classes which inherit from TestSetup. The order in which you add these is the order in which these tests will be executed. The addTestSetups should be the last method you call before calling runTests. However, you are not required to call runTests. If you plan on running the tests manually, leave out the runTests method. In this case, addTestSetups would be the last method you call.
It should be noted that while the example above uses a coroutine to launch the testing, you are not required to do this. However, it is recommended in order to allow your tests to be setup asynchronously while your app is starting. Even without this coroutine, the runTests method does in fact run your tests inside its own coroutine.
5. Launching Codewif
How you launch your testing depends on whether you want to run your tests manually and interact with Codewif's UI or whether you want to launch your tests immediately without any user interaction. In your stub file, the function you use to launch testing is left empty. But on the test branch, it is replaced with your test code.
Start Testing Manually: Use a click event handler to launch Codewif. For instance, you could have a textview somewhere and add a click event handler to it which then launches Codewif.
Start Testing Automatically: Place this inside your main activity's onCreate method. You should do this after your app has already been initialized. This might mean having to test to see if all your app's setup conditions have been met before launching Codewif. In many cases, you can just simply place a call to your launch method as the last thing in your onCreate method. In other cases where it takes several seconds before your app completes a stable startup, you may find it easier to just use a delay in your launch code.
The following code shows how to launch Codewif:
Testing an Android Library
The above TestController example is for testing an Android app. If the project you are testing is a library, you would not use the setAppName method but rather the setLibraryPackageName instead. So replace the setAppName in the code above with:
NOTE: For the setLibraryPackageName and setVersionName methods, prefix the BuildConfig with the package name of your library. If you leave this out, BuildConfig may inadvertently refer to the package of the module used to launch the activity and the code below will not compile because LIBRARY_PACKAGE_NAME can only be referenced from a library module. See the sample app for testing a library for an example.
In order to test an Android library, you need to have an activity module in your project that is used to launch Codewif. You setup the activity module the same way as was described previously for testing an Android app. You then configure a debug configuration in Android Studio to launch your test activity. It is recommended that after calling runTests to start testing, you close your test activity with finish, as there is really no need for this activity other than to launch Codewif.
At this point, you have completed setting up your test and can run your app. Just make sure that you have selected the build variant for testing before running your app. It is very easy to overlook this and wonder why no in-app testing is available when you go to run the app.
Using the Codewif UI
The Tests Screen
The tests screen lists all the tests that have been defined:
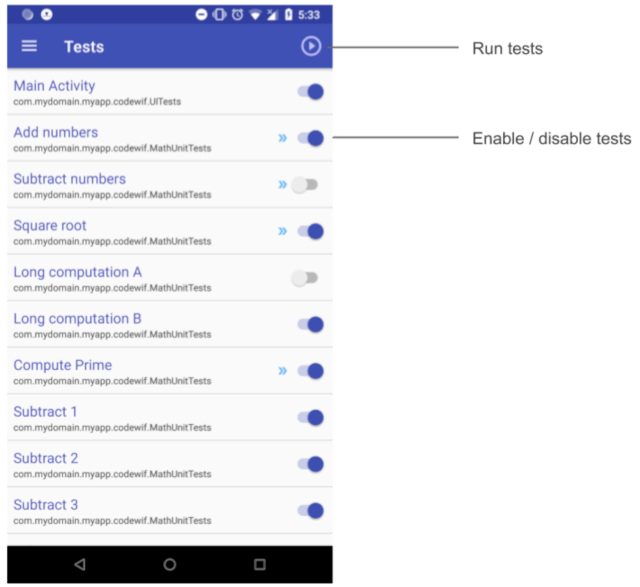
The tests are listed in the order in which they will be run. You can enable or disable a test. If a test is disabled, it will not be executed when you run the tests. You can also disable (skip) a test programmatically. This is useful in cases where you have a test that may take a long time to complete and you only want to execute it manually.
You Run button on the toolbar at the top is used to run all the tests. When you click on this, the screen switches to the Test Results screen, although it may be hidden during testing if you have configured your testing to do so.
You can also run any test by clicking on it.
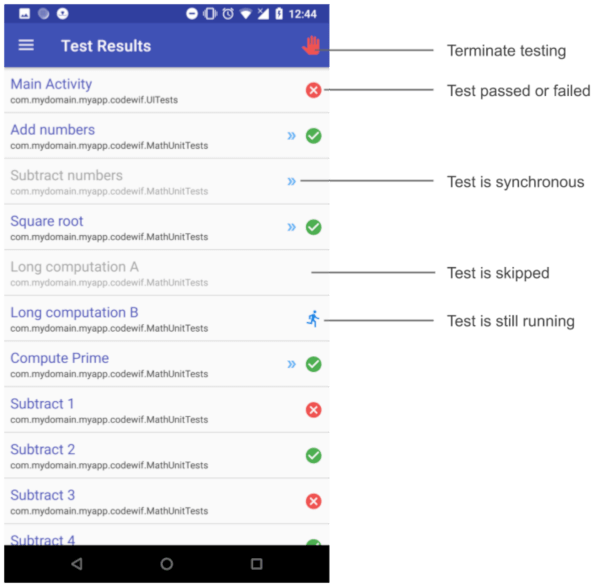
The Test Results Screen During Testing
The test results screen while testing is in progress:
The Test Results Screen After Testing
The test results screen when testing has completed:
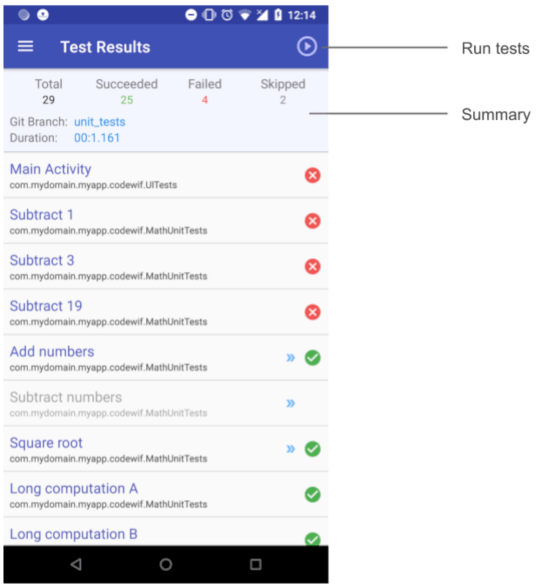
A summary is shown of the total tests defined, the total successes, the total failures and the total tests that were skipped. The git branch name is shown to indicate the branch that was used to compile and run the tests. The duration indicates how long it took to run all the tests. If you want, you can run the tests again by clicking on the Run button in the top right corner.
When testing starts, the tests are listed in the order in which they will be executed. But if a test fails, it is moved to the top of the list. The first test that fails is always the first item in the list followed by the next test that fails and so on. Testing is always in progress if the Stop button (the hand icon) is visible.
You can also configure your TestController so that testing terminates whenever the first test fails. By default, all tests are executed, even when one fails.
Viewing a Failed UI Test
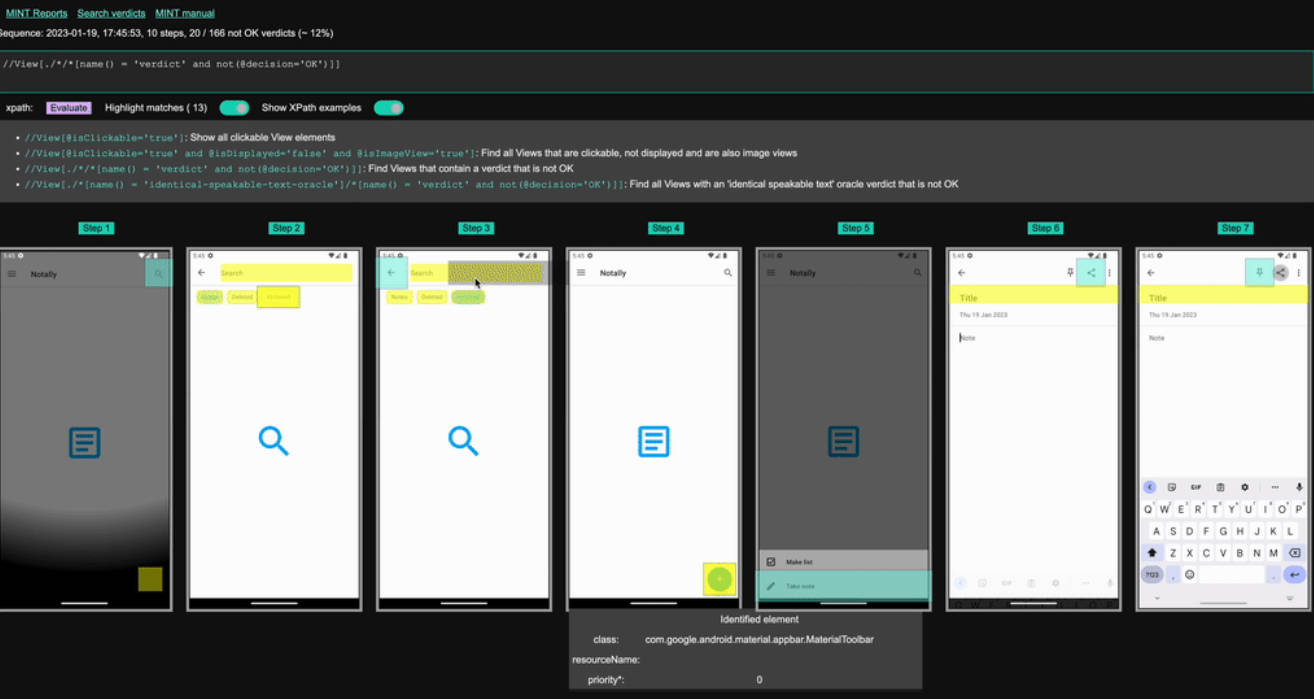
The following animated gif shows a UI test that failed. If you click on the test and scroll to the bottom of the screen, you can slide the slider to the far right and the previous image of the UI will appear over top the current snapshot. You can easily see in this example that the title text and its color has changed as well as the padding on the button:
If the current snapshot is correct and you want it to replace the previous one, click on the options menu in the top right corner on the status bar and select Update snapshot image.
The Codewif API
For detailed information on the classes and methods provided by Codewif's library framework, see:
The Codewif API documentation.
Sample Code
The samples folder contains a few samples to test out Codewif. The module appTestSample is an Android app and demonstrates both unit tests and UI tests. The libTestSample is also an Android app but includes an Android library module that will be tested. This app demonstrates how to test an Android library.
The Codewif project on Github includes the branches unit_tests and ui_tests. Codewif uses itself to test its own code. These branches have modules that contain test code. You can review these as additional examples on how to implement Codewif testing.