? JetTaskBoardKMP – Multiplatform Trello Clone
A clone of Trello app built using Compose Multiplatform for Android, iOS and Desktop.
This app was previously written in Jetpack Compose for Android in JetTaskBoard. It is now re-written using multiplatform.
Application demo
JetTaskBoardKMP.mp4
⚒️ Architecture
JetTaskBoardKMP follows the principles of Clean Architecture.
?? Tech stack
| Tools | Link |
|---|---|
| ? Language | Kotlin |
| ? Framework | Compose Multiplatform |
| ? Lifecycle | Essenty |
| ? State Management | Decompose |
| ? Networking | KTor |
| ? Multi-threading | Kotlin Coroutines |
| ? Persistence | Multiplatform Settings |
Special thanks to xxfast/KRouter library.
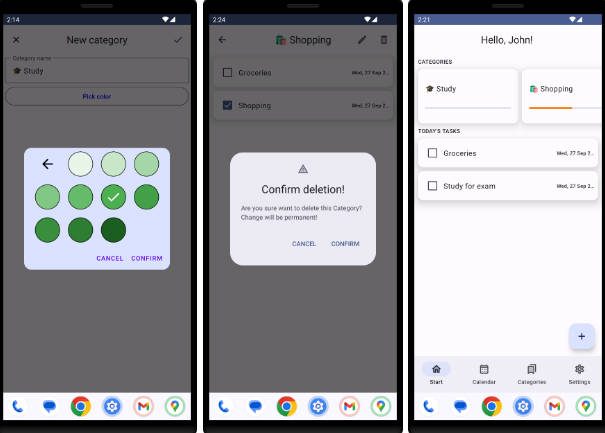
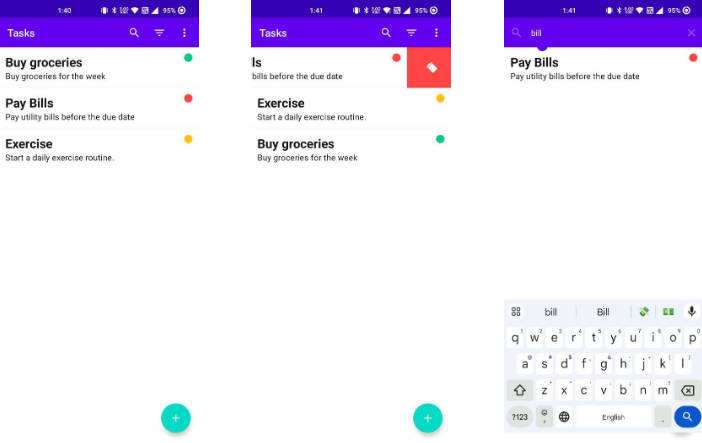
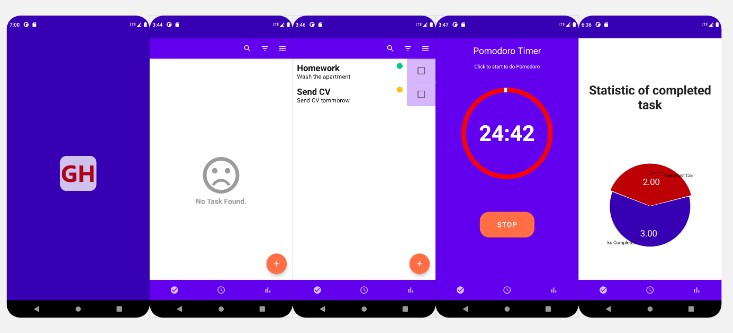
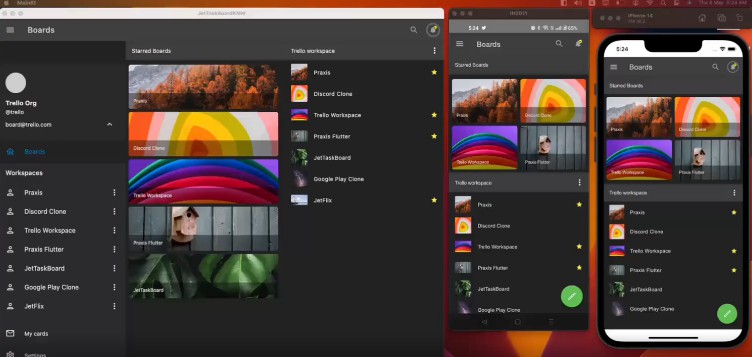
?️ Screenshots
| Home | Board |
|---|---|
 |
 |
How to run the project? ✅
To run this project, you need the following:
- A machine running a recent version of macOS
- Xcode
- Android Studio
- The Kotlin Multiplatform Mobile plugin
- The CocoaPods dependency manager
Check your environment
Before you start, use the KDoctor tool to ensure that your development environment is configured correctly:
-
Install KDoctor with Homebrew:
brew install kdoctor -
Run KDoctor in your terminal:
kdoctorIf everything is set up correctly, you’ll see valid output:
Environment diagnose (to see all details, use -v option):
[✓] Operation System
[✓] Java
[✓] Android Studio
[✓] Xcode
[✓] Cocoapods

Conclusion:
  ✓ Your system is ready for Kotlin Multiplatform Mobile development!
Otherwise, KDoctor will highlight which parts of your setup still need to be configured and will suggest a way to fix them.
Understanding the project structure
Open the project in Android Studio and switch the view from Android to Project to see all the files and targets belonging to the project:
Your Compose Multiplatform project includes 3 modules:
shared
This is a Kotlin module that contains the logic common for both Android and iOS applications, that is, the code you share between platforms.
This shared module is also where you’ll write your Compose Multiplatform code.
In shared/src/commonMain/kotlin/App.kt, you can find the shared root @Composable function for your app.
It uses Gradle as the build system. You can add dependencies and change settings in shared/build.gradle.kts.
The shared module builds into an Android library and an iOS framework.
androidApp
This is a Kotlin module that builds into an Android application. It uses Gradle as the build system.
The androidApp module depends on and uses the shared module as a regular Android library.
iosApp
This is an Xcode project that builds into an iOS application.
It depends on and uses the shared module as a CocoaPods dependency.
Run your application
On Android
To run your application on an Android emulator:
-
Ensure you have an Android virtual device available. Otherwise, create one.
-
In the list of run configurations, select
androidApp. -
Choose your virtual device and click Run:


Alternatively, use Gradle
To install an Android application on a real Android device or an emulator, run ./gradlew installDebug in the terminal.
On iOS
Running on a simulator
To run your application on an iOS simulator in Android Studio, modify the iosApp run configuration:
-
In the list of run configurations, select Edit Configurations:

-
Navigate to iOS Application | iosApp.
-
In the Execution target list, select your target device. Click OK.
-
The
iosApprun configuration is now available. Click Run next to your virtual device.

Running on a real device
You can run your Compose Multiplatform application on a real iOS device for free. To do so, you’ll need the following:
- The
TEAM_IDassociated with your Apple ID - The iOS device registered in Xcode
Note Before you continue, we suggest creating a simple “Hello, world!” project in Xcode to ensure you can successfully run apps on your device. You can follow the instructions below or watch this Stanford CS193P lecture recording.
How to create and run a simple project in Xcode
- On the Xcode welcome screen, select Create a new project in Xcode.
- On the iOS tab, choose the App template. Click Next.
- Specify the product name and keep other settings default. Click Next.
- Select where to store the project on your computer and click Create. You’ll see an app that displays “Hello, world!” on the device screen.
- At the top of your Xcode screen, click on the device name near the Run button.
- Plug your device into the computer. You’ll see this device in the list of run options.
- Choose your device and click Run.
On Desktop
To run the application on desktop:
- Execute the command from terminal:
./gradlew :shared:run
Find this project useful ? ❤️
- Support it by clicking the ⭐️ button on the upper right of this page. ✌️
License
MIT License

Copyright (c) 2022 Pushpal Roy

Permission is hereby granted, free of charge, to any person obtaining a
copy of this software and associated documentation files (the "Software"),
to deal in the Software without restriction, including without limitation
the rights to use, copy, modify, merge, publish, distribute, sublicense,
and/or sell copies of the Software, and to permit persons to whom the
Software is furnished to do so, subject to the following conditions:

The above copyright notice and this permission notice shall be included
in all copies or substantial portions of the Software.

THE SOFTWARE IS PROVIDED "AS IS", WITHOUT WARRANTY OF ANY KIND, EXPRESS OR
IMPLIED, INCLUDING BUT NOT LIMITED TO THE WARRANTIES OF MERCHANTABILITY,
FITNESS FOR A PARTICULAR PURPOSE AND NONINFRINGEMENT. IN NO EVENT SHALL THE
AUTHORS OR COPYRIGHT HOLDERS BE LIABLE FOR ANY CLAIM, DAMAGES OR OTHER LIABILITY,
WHETHER IN AN ACTION OF CONTRACT, TORT OR OTHERWISE, ARISING FROM, OUT OF OR IN
CONNECTION WITH THE SOFTWARE OR THE USE OR OTHER DEALINGS IN THE SOFTWARE.