Paylivre SDK Gateway Android
This document will guide your integration process with Paylivre’s payment SDK gateway for mobile devices.
Paylivre SDK Gateway Android – Full integration documentation
https://paylivre.github.io/sdk-gateway-mobile-docs
Paylivre SDK Gateway Android – Kotlin Docs
https://paylivre.github.io/sdk-gateway-android
Features
- ? Precise documentation to help your merchant transact using Paylivre;
- ? Android integration with Java or Kotlin. Get started now!
Preview
Index
SDK Installation – Step by step for the installation
To properly install Paylivre’s SDK Gateway for Android projects follow the steps below.
Add dependencies
We recommend using Android Studio as an IDE and Gradle to manage dependencies. You will need to add 2 dependencies: (step 1) jitpack*; and (step 2) our implementation. * For the jitpack, depending on your project organization, you will have 2 different scenarios, both shown below:
Step 1: JCenter and jitpack – Scenario A (newer projects)
To your root settings.gradle, inside of dependencyResolutionManagement > repositories, please add the following dependencies:
// ... other configs
dependencyResolutionManagement {
  // ... other dependencies
  repositories {
    // ... other repositories
    jcenter() // Make sure you have the JCenter repository
    maven { url 'https://jitpack.io' }
  }
}
Step 1: JCenter and jitpack – Scenario B (older projects)
To your root build.gradle, at the end of repositories, please add the following dependencies:
// ... other configs
allprojects {
    repositories {
      // ... other repositories
      jcenter() // Make sure you have the JCenter repository
      maven { url 'https://jitpack.io' }
    }
}
Step 2: Our implementation
For the packages that you choose to implement Paylivre’s SDK Gateway (example: ‘app’), open its build.gradle and add the following implementation:
// ... other configs
dependencies {
  // ... other dependencies
  implementation 'com.github.paylivre:sdk-gateway-android:0.0.1_beta'
}
SDK Implementation – Step by step for the installation.
For a quick view (demo) of Paylivre’s SDK Gateway, please refer to the Quick implementation section.
To properly implement Paylivre’s SDK Gateway, please checkout the Choose your checkout method section.
In your app, you can invoke our SDK at any given moment, being at the Activity or at any given fragment.
The examples in this section below and throughout this documentation will occur at the MainActivity.kt.
Quick implementation
To enable your team to quickly implement and test our SDK solution, follow the steps below.
Step 1 – Import
In your MainActivity.kt file, start by importing the StartCheckoutByURL class, as follows:
// ...other imports
import com.paylivre.sdk.gateway.android.StartCheckoutByURL
Step 2 – Instantiating and running the class
Kotlin:
At your MainActivity.kt file, inside the onCreate function, lets:
- instantiate a mocked generated URL for testing (line 6);
- Create a new function to instantiate the class
StartCheckoutByURLand then build it (line 8 through 11); - Method that initializes the SDK (at line 14);
- Finally, run the function (at line 16).
class MainActivity : AppCompatActivity() {
override fun onCreate(savedInstanceState: Bundle?) {
// ...other
// mocked generated URL for testing
val generatedUrl = "https://dev.gateway.paylivre.com?merchant_transaction_id=a47fc29a7b&merchant_id=302&operation=0&email=user_gateway_test@tutanota.com&document_number=61317581075&amount=500¤cy=BRL&type=15&account_id=123654asd&callback_url=https://www.google.com&redirect_url=https://www.merchant_to_you.com&auto_approve=1&signature=JGFyZ29uMmkkdj0xOSRtPTE2LHQ9MixwPTEkWVdRNU5XWTVaR1UyT1RnNE5ETSRKYWlvWmRwc3J1L3cyQlJzVlBzd25B&logo_url=https://github.com/paylivre/gateway-example-react-js/blob/master/assets/logo_jackpot_new.png?raw=true"
// new function declared
fun startCheckoutByUrl() {
val checkout = StartCheckoutByURL.Builder(
url = generatedUrl,
).build()
// method that initializes the SDK
checkout.startPayment(this)
}
startCheckoutByUrl() // run the function
}
}
Java:
At your MainActivity.java file, lets:
- Create a new function to instantiate the class
StartCheckoutByURLand then build it (line 4 and 5); - Method that initializes the SDK (at line 8);
- Inside the
onCreatefunction, instantiate a mocked generated URL for testing (line 14); - Finally, run the function (at line 16) with the two arguments.
public class MainActivity extends AppCompatActivity {
// ...other
void startCheckoutByUrl(Integer requestCode, String url) {
StartCheckoutByURL checkout = new StartCheckoutByURL.Builder(requestCode, url).build();
// method that initializes the SDK
checkout.startPayment(this);
}
protected void onCreate(Bundle savedInstanceState) {
// ...other
// mocked generated URL for testing
String generatedUrl = "https://dev.gateway.paylivre.com?merchant_transaction_id=a47fc29a7b&merchant_id=302&operation=0&email=user_gateway_test@tutanota.com&document_number=61317581075&amount=500¤cy=BRL&type=15&account_id=123654asd&callback_url=https://www.google.com&redirect_url=https://www.merchant_to_you.com&auto_approve=1&signature=JGFyZ29uMmkkdj0xOSRtPTE2LHQ9MixwPTEkWVdRNU5XWTVaR1UyT1RnNE5ETSRKYWlvWmRwc3J1L3cyQlJzVlBzd25B&logo_url=https://github.com/paylivre/gateway-example-react-js/blob/master/assets/logo_jackpot_new.png?raw=true";
startCheckoutByUrl(null, generatedUrl); // run the function
}
}
For java projects, requestCode is a required argument for the startCheckoutByUrl function, thus, we need to pass down at least null. Learn more at the Activity result section.
Result
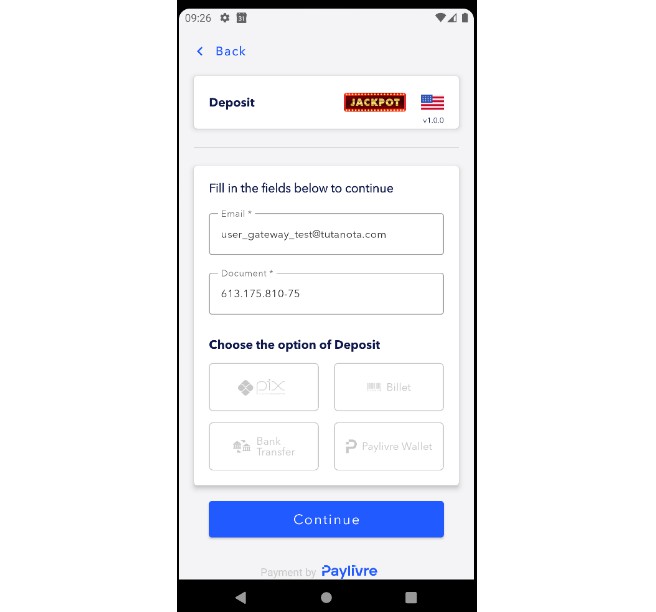
Done! As a result of the implementation presented above, you will get to the following screen:
Choose your checkout method
For a more customized and complete experience, Paylivre offers two different checkout methods. To learn detailed information about these two, access: (a) StartCheckoutByURL and (b) StartCheckoutByParams


