Android App Architecture in The App Factory
Authors
- Marshall Ladd
The MVVM Design Pattern
Contents
Introduction
This project is to provide a simple example app for Android Developers
at The App Factory to reference when starting a new app, or adding new
features to an existing app.
The architecture pattern shown here and to be used in apps, whenever
possible, is Model-View-ViewModel, or MVVM. This is the pattern
recommended and used by Google.
App Features
- Connects to a remote database –
documentation - Downloads JSON(Employee) data from remote database
- Stores data in Room Database in app
- Displays list of Employees from database
- Allows searching of database
- Select a single Employee and show details of
Language and IDE
This project was written using Kotlin 1.3.60 in Android Studio 3.5.2.
All Android apps in the App Factory will be written in Kotlin.
Prerequisites
This project assumes a base knowledge of Kotlin and Android, such as
Activities, Fragments, RecyclerViews, and the Manifest.
How to Use This Guide
This README has a general summary of the design principles used in this
app, using code snippets to show simplified examples to accompany the
explanations. You should reference the code in the app for the complete
implementation of classes.
Further down the guide, there is a Step By Step summary
of how I built this app. I will briefly explain what I implemented, in
the order I implemented it.
The Master branch will always have the latest full, approved, running,
and commented code.
After that, there is a section for developers, new and experienced, who
are asked to jump on a project that’s already going. This section will
walk you through my steps on how I approach someone else’s code. The
steps I will go over are applicable to any and all Android apps, not
just one’s that use MVVM. I will be using this app as an example, and
pretending we had no comments while I do so.
MVVM
What is MVVM?
MVVM is a flexible guide and set of libraries used to standardize an
app’s architecture. What this means is that your code is split into
distinct components that hold specific parts of code in specific areas.
These parts then interact with each other in a set order. These parts
are:
Model
The Model consists of three parts
- Database Class
- DAO Interfaces
- Data Model Classes
In this app, our local database is Room. In other apps, Firebase may be
the database. The flexibility of MVVM allows for these differences, and
does not specify what to use, just where to put the code.
View
The View is the UI presentation logic. It consists of
- Activities
- Fragments
- Adapters
- XML
The View should only be responsible for displaying values and state.
Another way to say that is you should not make database requests and/or
network requests in the View. These will be done elsewhere. This means
the Views don’t care where the data comes from or how it gets there, it
just shows whatever data there is. This way, if a change needs to be
made to the database, the View should not need to be changed at all.
View Model
The View Model is responsible for interacting with the Database and
coordinating between any remote sources. It is then responsible for
representing the state of the data to the View. This coordination
creates what is known as a single source of truth and exposes it to
the Views. This way, you can be as sure as you can be, that what is
being shown to the user is accurate, and where it came from.
ViewModels provided by the Jetpack components are also Lifecycle aware,
and can survive configuration changes. This helps:
- Prevent memory leaks
- Prevent errant network calls
- Prevent null pointer exceptions due to UI changes
- Solves the issue of what happens when you rotate an app
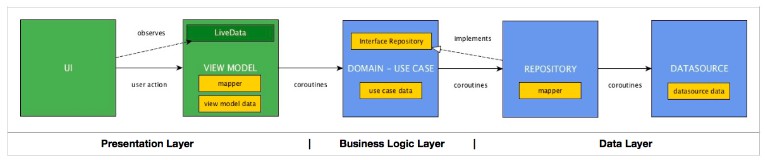
How it works
As mentioned before MVVM breaks the app into components and they
interact in a certain way. This interaction follows the pattern:
- The View subscribes to a LiveData from a ViewModel
- The ViewModel connects to a repository
- The Repository connects to databases, both remote and local, if there
are both - The Repository returns the requested data to the the ViewModel
- The ViewModel formats the data and exposes it through a LiveData
- The View’s subscriptions are notified of any changes through the
LIveData, and updates the UI to match
LiveData
LiveData was mentioned a few times, so what is it? LiveData is a wrapper
class for data objects. It is observable from a View. Being observable
is a way to automatically call update UI logic, anytime the data is
changed. There’s more to it than all that, but those are the very
basics. If they don’t make sense now, they will after you use them.
Basic MVVM Example
Inside of a Fragment such as ListFragment, get an instance of the
ViewModel needed. Here we are using a shortcut method, thanks to a KTX
library.
private val listViewModel by viewModels<ListViewModel>()
The ViewModel will have a Function or Object that triggers background
database and network requests, and immediately returns a LiveData Object
to be observed.
fun getAllEmployees(): LiveData<List<Employee>> {
    // Database and or network logic happens
    // return LiveData<List<Employee>>
}
Then, back in the Fragment, you can call to this method, and observe the
returned LiveData and update your UI with the contained data. When the
background database or network requests finish, they post their updates
to this Object, triggering a UI update.
listViewModel.getAllEmployees().observe(this) { employeeList ->
        recyclerViewAdapter.submitList(employeeList)
        // other operations related to getting new data
}
Room Database
This app uses the Room Database library, provided by Google as part of
Android Jetpack. Room is a wrapper for Android’s SQLite DB. Essentially,
it operates like Retrofit, but for database calls. It relies heavily on
annotations to generate code for you. Room also natively supports
LiveData.
Documentation can be found here.
A tutorial on Room, provided by Google, can be found
here.
Basic Room Example
Room consist of three main parts
- The Database Class
- Data Access Object Interfaces
- Annotated Data Classes
First, create a Data class to store in Room and add the @Entity and
@PrimaryKey annotations where needed.
@Entity(tableName = "employee_table")
data class Employee(@PrimaryKey val id: Int, val name: String)
Next, create a Data Access Object Interface or DAO. This is where you
will define all of your database CRUD actions. Note all the annotations
and that this is an interface, and you do not write any function bodies.
Room will write these for you.
@Dao
interface EmployeeDAO {

    @Insert(onConflict = OnConflictStrategy.REPLACE)
    fun insertEmployee(employee: Employee)

    @Delete
    fun deleteEmployee(employee: Employee)

    @Query("SELECT * FROM employee_table")
    fun getAllEmployeesLiveData(): LiveData<List<Employee>>

    @Query("SELECT * FROM employee_table WHERE id = :employeeId")
    fun getEmployeeByIdLiveData(employeeId: Int): LiveData<Employee?>
}
Finally, we create our database class by extending RoomDatabase and
marking it with some more annotations.
@Database(entities = [Employee::class], version = 1, exportSchema = false)
abstract class ExampleRoomDB : RoomDatabase() {

    abstract fun getEmployeeDao(): EmployeeDAO

    companion object {
        private var INSTANCE: ExampleRoomDB? = null

        fun getDatabase(context: Context) = INSTANCE ?: kotlin.run {
            Room.databaseBuilder(
                context.applicationContext,
                ExampleRoomDB::class.java,
                ROOM_DB_NAME
            )
                .fallbackToDestructiveMigration()
                .build()
        }
    }
}
In the above code, you tell Room which classes are going to be stored in
the DB, what version the DB is on, and another flag that isn’t important
now. Keep it false. We also define an abstract function that return the
DAO we created earlier. Do this for all DAOs in your app.
When using Room, we also need to make a slight change to our ViewModels.
If the ViewModel needs to access the Room Database, either directly or
through a repository, it will need to extend AndroidViewModel
instead of the normal ViewModel.
ViewModel Used WITHOUT Room
class DetailViewModel : ViewModel() {
    // ViewModel methods here
}
ViewModel Used WITH Room
class DetailViewModel(application: Application) : AndroidViewModel(application) {
    // ViewModel methods here
}
At this point, you can get an instance of your DB and get an instance of
the DAO, and start making calls to and storing data in your DB. These
calls could be made directly in the Fragment, but that would be mixing
components in MVVM(calling DB logic from the View).
We could call the DAO methods from the ViewModel and expose the results
to the UI through that. This is an acceptable approach, and a relatively
good one. However, there is a better way.
Repositories
Repositories, while not required and aren’t an official component of
MVVM, they are considered a good practice. Especially when you have data
being stored locally and data available on a remote API. The repository
provides what is known as a single source of truth. More simply put,
when data is coming possibly coming from multiple locations, the
repository decides what is valid, what to show, where to call, and when
to make those calls.
Basic Repository Example
Let’s assume that our app has a Room Database completely set up,
Retrofit for API calls, and an AndroidViewModel as described in previous
sections. Create a new repository class. In this class, get an instance
of the DAO and RetroFit interfaces.
class EmployeeRepository private constructor(application: Application) {
    private val employeeDAO: EmployeeDAO = ExampleRoomDB.getDatabase(application).getEmployeeDao()
    private val employeeCalls = RetroFitInstance.getInstance().create(EmployeeEndpoints::class.java)
}
Suppose we want to show the entire list of Employees. We need to check
the API for current data, store this data, and show it to the user. But
what if there is an update to the data, or what if the network is down.
This is where the repository comes into play.
You will create a method that calls to the API AND to the local
database.
suspend fun getAllEmployeesLiveData(): LiveData<List<Employee>> {
        return employeeDAO.getAllEmployeesLiveData().also {
            try {
                val employeeList = employeeCalls.getEmployeeList()
                employeeList.forEach {
                    insertEmployee(it)
                }
            } catch (exception: Throwable) {
                Timber.e(exception)
            }
        }
    }
The data in the database will be shown to the user immediately, through
LiveData, while, in the background, a request to the API for new and
current data has been made. When that request comes back, each result is
inserted into the database. Since we returned a LiveData, any updates to
the Database will notify the LiveData, which will update itself with the
current information.
Finally, update our ViewModel to use our repository, instead of calling
to the API or to the database directly.
class ListViewModel(application: Application) : AndroidViewModel(application) {

    private val employeeRepository = EmployeeRepository.getInstance(application)

    val employeeListLiveData: LiveData<List<Employee>> = liveData(Dispatchers.IO) {
        emitSource(employeeRepository.getAllEmployeesLiveData())
    }
}
Now your UI should update with the most current data, and also be able
to show data that was stored if there is no network.
If you follow the steps in this guide, you’ll notice that once we set up
our Fragment, and subscribed to a LiveData object from a ViewModel, we
never had to change anything in our Fragment. It just kept on working.
This is what MVVM does for you. When you need to change a component, it
doesn’t affect other components.
For example, it’s a week before this app is deploying and we decided to
change our Database from a REST API, like this app does now, to
Firebase’s Firestore. What would need to be changed? Firebase provides
it’s own local backup, so we won’t need Room anymore. Firebase also has
it’s own calls to the API, so we can’t use Retrofit calls either.
Thankfully, all of that is in one place, the repository. We just change
the functions in the repository to use Firebase, remove the unneeded
code, and everything else remains the same. As long as we keep returning
LiveData, the UI won’t care where it came from, just as that it gets
there.
Final Thoughts on MVVM
That’s it. This app is ready to be released or expanded on. You could
add more endpoints, add new database operations, add new screens, add
new data classes, add whole new features, whatever. Just follow the
patterns seen here when doing so as best you can.
This guide is meant to be a general summary of the MVVM concept and give
you an idea of how to implement it in your app. It is not a perfect
example. For instance, MVVM recommends the use of DataBinding or
ViewBinding and I did not use any of it in this app. This app is meant
to be a starting point. Any improvements and further refinement to the
design should be encouraged, however, deviations from the main design
pattern should be kept to a minimum whenever possible.
Code Style Guide
The following naming and style conventions should be used across all
projects to aid in readability of code from one project to another.
Variables
- Standard variables shall be named using camelCaseNotation.
- Hungarian notation(mVarName, sVarname, etc.) is NOT to be used.
// Do this
val thisIsAVariable = "Some String value"
// Don't do this
val mThisIsAMemberVariable = 42
Constants
- Constants shall be declared in all caps.
const val THIS_IS_A_URL_CONSTANT = "https:\\www.google.com"
Functions
- Functions and their parameters will be named using camelCaseNotation.
- If there is no return value, omit return value in signature.
// A function with no parameters or return value
fun aBoringFunction() {
    // Does stuff
}
// A function with parameters and a return type
fun doSomeMath(inputA: Int, inputB: Int): Int {
    return inputA + inputB
}
// This is wrong.
fun NotInCamelCase(): Unit {
    println("I return nothing and should not have Unit in my signature.")
}
Classes
- Classes shall be named in FirstLetterCapsCamelCase.
- When possible, data classes should be used over standard classes.
data class ExampleDataClass(
    val id: Int,
    val exampleField: String
)
ktlint
ktlint is a linter and formatter for Kotlin code. What that means is
that it will go through your code and look for formatting errors and fix
them for you. Things like adding to many indents or spaces before or
after lines, removing unused imports, and ensuring the guidelines above
are being followed are taken care of for you by running a simple script.
Installation and usage instructions can be found here:
View id’s
- View id’s shall be named using camelCaseNotation
- id’s shall be formatted viewTypeThenFunction
<TextView
    android:id="@+id/textViewUserName" />
<Button
    android:id="@+id/buttonSubmitForm" />
Other Tools
Navigation
This app uses the Navigation Component from Jetpack. More can be read
about it from the official documentation from Google, as well a
simple tutorial
to show you the basics.
This app does not use the SafeArgs plugin as it was meant to be very
simple. This plugin, described in the tutorial and documentation should
be used when possible.
Splash Screens
This app shows an example on how to properly implement a Splash(startup)
Screen. A splash screen is a good practice as it gives the user
something to look at while the app is loading, instead of a plain, white
screen. This method is from an
article
by BigNerdRanch. It is written in Java and from 2015, but still applies.
The Java translates directly to Kotlin and the rest stays basically the
same.
Important Note
If your app implements a login screen, the SplashActivity is an ideal
place to execute logic to verify if a User is still logged in or not,
and send them to the correct portion of the app, based on the result.
Retrofit2
Retrofit2 is a library, written by Jake Wharton, for performing RESTful
API requests on the background, simply and without having to write any
real code. It accomplishes this through annotation processing. Think
Room DAO interface methods, but for network requests. This is the
industry standard way to do all of your RESTful API calls.
A recent update added support for Kotlin coroutine suspend functions,
making Retrofit2 easier to use than ever.
More info and documentation about Retrofit2 can be found at the
following locations:
Timber
Timber is another library written by Jake Wharton, that makes writing
log messages easier, and helps prevent them from making it into a
production release. As a good practice, all log messages lower than the
Warn level should be removed before being released to production. Timber
does this for us.
More information can be found here:
Material Components
Material Components are a set of libraries that allow you to quickly and
consistently theme your apps. You’ll notice that in all the Layout XML
files, size, color, font size, and attributes like that are never
directly set. All of them rely on MaterialComponent styles and themes.
This app has a very basic implementation of it, and is only using the
color portion and part of the typography tools. There is a whole shape
component as well.
The Material design team has provided an app for you to run from Android
Studio where you can customise various XML files to modify the apps
theme. You can then run the app and see what all the components would
look like using that theme. You can then copy/paste the theme files from
that app into any other app, and you will have a new theme and look for
your app.
More information and that app can be found here:
Instructions
Step By Step
While an attempt was made to do everything in order, document
everything, and get it all correct, there may be errors or things
missing from this guide. If you find something, please refer to
Submit Changes for info on how you can submit an
update or fix for it.
Each step in this guide has an associated branch in this repository.
Checking out each branch will show you how the app would look after
finishing the step. Large portions of the app may be refactored from
step to step. Refer to the master branch for the final implementation.
- Create a new project in Android Studio.
- Min API level 21 is the absolute minimum we should select here
- API level 23 would be preferred
- Don’t create a default Activity yet
- Dependencies and Activities
- Add known dependencies and settings to gradle
- In this instance, it is best to use the gradle from the Master as
your example, and not the one in this steps branch
- In this instance, it is best to use the gradle from the Master as
- Add Splash Activity to project
- Do not generate XML/UI for this
- Set this as the Launcher Activity
- Add Main Activity
- Do generate XML/UI for this
- Do not make this the Launcher Activity
- Implement splash screen
- Add known dependencies and settings to gradle
- Fragments
- Add Start, List, Search, and Detail Fragment
- Start Fragment – select Fragment (blank) from menu
- All others – select Fragment (with ViewModel) from menu
- Add Start, List, Search, and Detail Fragment
- Navigation
- Implement basic navigation for the app
- NavGraph
- Connect MainActivity
- Implement basic navigation for the app
RUN THE APP
The app should run at this point. It will load the MainActivity, which
should be displaying the StartFragment. Unless you update the UI and
connect buttons, you’ll only be able to see StartFragment. This will
happen in the next step.
If this is not happening, troubleshoot until it is. DO NOT continue
until this is working.
- UI
- Design the app UI in XML
- Add Buttons, RecyclerView, etc. to all screens
- Finish Navigation
- Navigate between Fragments using the Navigation Component
- Does not need to pass data between Fragments yet
RUN THE APP
Make sure the app behaves as expected and navigates between the screens
correctly. If it doesn’t, troubleshoot until it does, then move on.
- Data Classes
- Create the Employee Data Class
- Employee in this example has annotations in places
- Annotations are in preparation for Retrofit
- RecyclerViewAdapter
- Create the RecyclerViewAdapter for Employees
- Implement it in the list fragment
- Pass in a static test list of data to make sure it works
RUN THE APP
- Retrofit, LiveData, and ViewModels
- Create Retrofit Interface
- Make function that returns LiveData<List> in ViewModel
- Subscribe to that LiveData from the Fragment
- Back in the ViewModel make the network call using retrofit inside
of the function and emit its return value through the LiveData - Update RecyclerViewAdapter to receive its list from the LiveData
Observer
RUN THE APP
- Room and Repositories
- Implement Room according to the examples and documentation here
- Refactor Room and ViewModel to use the repository pattern
RUN THE APP
Congrats, you now have a basic app that connects to a remote API,
downloads and stores data, then displays that data. It also has offline
backup and a very simple search function.
How to Learn an App
In this section, I will describe the approach I take when looking at any
Android code for the first time. Following these steps will show you how
any app is structured, how it navigates between each screen, and where
any data is coming from and being stored. That’s about 80-90% of what an
app is. Even better, you’ll be able to do this, even if there is no
documentation or comments anywhere.
First thing I like to look at when I approach an app is the app’s gradle
file. In here you can see what version of Android they are targeting.
Further down the file, you’ll see what dependencies are being used and
if they are the current version or not. This can tell you a lot about an
app. Like if you were told it connects to a remote API and you don’t see
anything about Retrofit or Firebase, you’ll know to start worrying.
Next, I’ll open the manifest.xml file. The manifest essentially
describes the app to the operating system, so lets see what it’s saying.
    <manifest xmlns:android="http://schemas.android.com/apk/res/android"
        xmlns:tools="http://schemas.android.com/tools"
        package="ladd.marshall.androidmvvmexample">

<!--    Lots of other XML tags go here    -->

        </manifest>
This first section tells us what the package name of the app is. This
name must be unique across every app in the entire Play Store. In this
app, the package name is “ladd.marshall.androidmvvmexample”. This is an
incorrect package name for an App Factory app and should be fixed.
<uses-permission android:name="android.permission.INTERNET"/>
This block tells the OS which permissions the app will be using, such as
Internet, bluetooth, or location.
    <application
        android:name=".BaseApplication"
        android:allowBackup="true"
        android:icon="@mipmap/ic_launcher"
        android:label="@string/app_name"
        android:roundIcon="@mipmap/ic_launcher_round"
        android:supportsRtl="true"
        android:theme="@style/AppTheme"
        android:usesCleartextTraffic="true"
        tools:ignore="GoogleAppIndexingWarning">

<!--    Lots of other XML tags go here    -->
</application>
This tells us what the Application is, what it should be called,how it
should look, and if we have any special configurations we want to make.
The important line for us right now is the line that says name. If this
is not in your app, move on to the next section. Your app is using
default application settings, and this is ok and normal.
So what does this line mean to us? It points to a file somewhere in the
Project that is overriding the Application class. To quickly navigate to
that file, click on the value “.BaseApplication” then hit command + B on
a Mac, and you will be taken straight to that file. This shortcut will
be used often.
Our Application file is pretty boring. It is only setting up the Timber
logging dependency. In other apps, say one that was using the RealmDB
for its database, this is where you would init that. Let’s move on.
        <activity android:name=".view.activities.MainActivity" />
        <activity android:name=".view.activities.SplashActivity"
            android:theme="@style/SplashTheme">
            <intent-filter>
                <action android:name="android.intent.action.MAIN" />

                <category android:name="android.intent.category.LAUNCHER" />
            </intent-filter>
        </activity>
Now we are getting somewhere. Here we see all the Activities that are in
our app. Here we have a MainActivity and a SplashActivity declared.
Remember, Activities are what host our app’s UI and logic.
The key thing to look for are the lines in-between the intent-filter
flags. The tags MAIN and LAUNCHER we see here tell us that the
SplashActivity is the first Activity that will load when the app is
started up. This is huge information. Let’s see what our first activity
does. Click on its name value, and hit command + B to be taken to the
SplashActivity implementation.
Remember we are looking at this and imagining that there are no
comments. Looking at this activity, it looks like it loads up, makes an
Intent with MainActivity as an argument, and starts that Activity up. So
let’s see what happens in there. Click MainActivity and then command +
B.
We should now be in the MainActivity. Here we can see how the app
navigates around and what is shown to the User. This app uses the
navigation component, so we’ll need to go to the nav graph to see what
the first Fragment is. In other apps, you might see the Fragment loaded
here directly, in others, all the logic may reside inside of Activities.
Following our app’s logic, we can look at the nav graph and see that
StartFragment is our first Fragment shown to the User.
We now know how the app is configured based on our Application file,
what the first Activity is, where that Activity leads, what that new
Activity does, and finally, what the first screen is that the user will
interact with is, and where it goes from there. That’s a lot of
information already, but we can do better.
So let’s look at the first Fragment, StartFragment. It’s a simple
Fragment that navigates between screens. Let’s look at what happens when
we navigate to the ListFragment.
Open up ListFragment. We can see it is using a ViewModel and a
RecyclerView. If we want to get a quick look at the RecyclerViewAdapter,
select it in the code and hit command + B again. You’ll be taken
directly to the implementation. Back to the ListFragment. In it we see
it is getting data from the ViewModel and passing it to the Adapter. But
where is this data coming from? Select where we called
employeeListLiveData and command + B again to be taken to the funtion
inside the ViewModel.
In the ViewModel, we see that the LiveData is emiting a value from a
repository. Let’s select that method and command + B again. We are then
taken to a repository class that is making calls to our Room DB and
making calls to our Remote DB using Retrofit.
To learn more about the Room or Retrofit methods and values, we could
select them and hit command + B to be taken to our DAO and Retrofit
Interfaces.
Now we know how and where our app gets its data from, on top of all of
the things we had learned before, like how the app navigates from screen
to screen. And those are the most important details of how any app
works. Just follow the code from it’s entry point in the manifest until
you hit a dead end and can’t go any further in the app, then back up and
try again, going a different way until it dead ends. Keep doing this
over and over until you’ve explored the whole app, or just the section
you need to be working on and you’ll be up to speed in no time.
Other
Disclaimer
This app is meant to show architecture examples. It is NOT meant to
look good, or to show how to design a UI. There are some good practices
shown, such as using Material Theme and how to implement a proper splash
screen, but overall, DO NOT MAKE YOUR APP LOOK LIKE THIS.
This is a very basic example and is NOT meant to show how to do
everything, just a general structure to follow. For a more advanced
example of MVVM implemented in a larger app, reference the Unico Reports
Android App.
This app is NOT to be treated as the absolute only way to do things.
For instance, this app uses Room Database and Retrofit. If using
something else, such as Firebase, this pattern can still be followed.