//DONT_APPLY_TEMPLATE_CHANGE
Gradle Plugin Template Kotlin DSL Version
ℹ️ This template was planned to support only kotlin, but it also supports Java!
⚠️ This template is still in beta! If you have any issue using this template, please let us know!
ℹ️ This is a Developer Note, you don’t need to worry about this if you are a texture pack developer.
Contents
Gradle Plugin Template Kotlin DSL Version
Info
Template Maintainer: fan87Template Developer: fan87
Requirements
This template is not a template that everyone can use. It requires more skill than Maven Template, and I’m not joking. Most maven users who don’t understand Gradle will be very confused since they misunderstand what Gradle is.
If you still want to use this template because you were attracted by features it provides, you can watch This YouTube Video, I think he explains it pretty well and make everything clear.
Why Gradle?
Watch the video I mentioned above first, then ask again. If you lazy, then here’s why:
-
Gradle is using Build Script (
build.gradle) instead of structured file (pom.xml), so you can do anything you want in build script (including shut the computer down) without any plugin.⬆️
build.gradle.kts: Gradle allows you to run code in Kotlin or Groovy, execute them, and use return value, so you can do custom behavior without modifying source code of plugins -
Gradle is way faster than Maven. If you are experienced, you probably know that
Build Artifactfeature in IntelliJ IDEA is way faster than a mavenmvn packagebuild. Good new is Gradle is as fast as IntelliJ IDEA’s Build Artifact! Bad new is it’s way harder than maven, so there are still a lot of people using Maven.
Features
Here are some features that you didn’t expect to get (lol):
PlaceHolders
You can use and create your own PlaceHolder, so you can put something like CommitID, build date, project version into strings like this:
⬆️ Output
⬆️ Source Code
They are all calculated while Gradle is building it, so wherever you go the message will always be the same. Here’s the compiled code:
⬆️Decompiled code
Auto Copy + Reload
ℹ️ You need to enable RCON for this! If you want to change the host, port, or password, please check the
build.gradle.kts
You can now reload the plugin automatically every time you build!
Auto-Reload Setup
To set Auto Reload up, you need to do these following things:
- Go to your
server.properties, enable RCON, change the password to non-default value
- Now go to your run configuration (See also: Debug/Test Build), and add
SERVER_DIRenvironment variable:
Advanced Setup
If you want to use plugins like PlugMan X to reload your plugin, you can modify the command , or create a new task. (There will be example in build.gradle.kts, I added them after taking this screenshot and I’m lazy to do it again lol)
Advanced Setup – Windows
ℹ️ This is not required, and it happens randomly, so it doesn’t matter if you are lazy to do it.
⚠️ PlugMan X or PlugMan (Unrecommended) is required!
On windows, if the file is not closed yet, it will lock the file so other program don’t have access to write it. To deal with that, you probably need to run some new tasks: unloadPlugin and loadPlugin, execute it before copyPlugin, and then put loadPlugin after copyPlugin.
NMS Support
ℹ️ This is disabled by default! If you want to enable it, change
enableNMSto true
?? This feature is in experimental state. If you got any issue using this feature, please let us know!
⚠️ This only supports 1.17 or above for now. If you want to have 1.17- NMS support, please change the dependency directly to
org.spigotmc:spigot:<version>!
ℹ️ This is basically same as Spigot’s Special Source Plugin but for Gradle. So if you want more information about it, please check me
You can call NMS methods with remapped name directly, so you can do stuff like send packet etc.
Setup
- Download build tool
- Run it:
java -jar BuildTool.jar --rev <minecraft version> --remapped
- Now, change the
enableNMSto true (in yourbuild.gradle.kts)
- Now, change the building command by inserting
remapafterapplyPlaceHolder. OUTDATED
Singleton Support
?? This feature is in experimental state. If you got any issue using this feature, please let us know!
⚠️ This feature is Kotlin only! It won’t work in Java!
You can finally stop using MainClass.INSTANCE! With Kotlin, MainClass will be converted into MainClass.INSTANCE
Project Setup
ℹ️ This is not a Kotlin, Gradle or Java tutorial. I won’t be explaining everything because there are too many things that can happen while you doing them, even if you are experienced using Google, keep in mind that there aren’t many resources out there on it since Gradle community is way smaller than Maven’s.
- Load
gradle.build.ktsas Gradle Project - Normally, it will fail with
Unsupported class version. But don’t worry. - Go to the Gradle Settings
- Select Java 11 or above (
Gradle JVMOption), then click on OK
- Choose the language you want, you can use Kotlin or Java, then delete one of those two folders. You can also keep 2 of them if you want to. If you use Java, REMEMBER TO REMOVE
dependsOn("kotlinSingleton")
- Now, decide if you are going to use NMS, and what the Minecraft version will be, and modify the
build.gradle.kts:
- After that, you can start adding your own place holders. There are some examples in those two main classes, and
build.gradle.kts:
Main.kt: Example usage. It also works with Java. Keep in mind that you can’t split them to make them something like "%GradlePluginTemplate.PlaceHolder" + ".CommitID%", it won’t work
build.gradle.kts: This registers some placeholders like GradlePluginTemplate.PlaceHolder.Version. Note that GradlePluginTemplate will be replaced by GitHub to your repository name.
Project Build
Building
⚠️ This is still in Experimental state, if anything went wrong, please report the issue to the template maintainer or developer.
Building
You can use debug to do autorealod
Debug/Test Build
⚠️ You have to follow the instruction @ Auto Reload Setup
If you want to do debug it (like Auto Reload and stuff), run debug instead. You also need to put environment variable SERVER_DIR in (as the root directory of your server). You also have to follow instructions @ Auto Reload Setup in order to use it.
Output
⚠️ If you have enabled NMS, the final output will be
project-name-1.0-SNAPSHOT-remapped.jar
(I know there are some people who don’t use Gradle out there being confused why isn’t there target directory.)
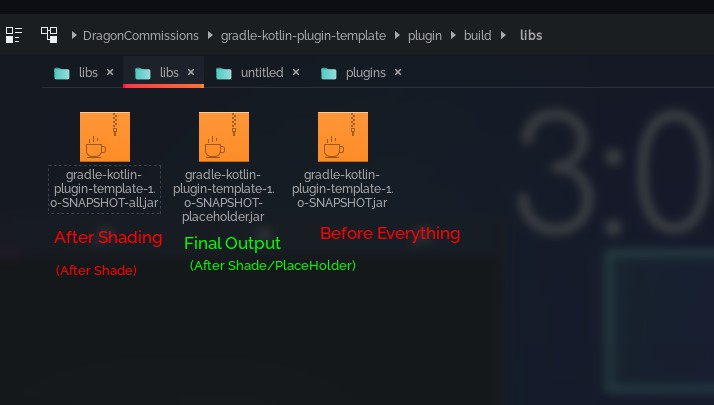
The output jar is located at build/libs/, and if you want to have version with working placeholders, choose the one with placeholder-applied prefix:
(3 AM if you are wondering what is 3:0 in the background lol)
Use this template
⚠️ Normally, you don’t have to do this, so don’t worry about it
⚠️ IN THIS VERSION, IT’S REQUIRED! YOU HAVE TO DO THIS SINCE GITHUB ACTIONS WERE NOT DONE YET!
If you are on GitHub, and you want to use this template:
- Click on
Use this template
- Now, create a repository using that template
⚠️ Please use the same naming method for your Repository Name! (replace
with-, and first letter of words are caps)
- Wait for it…
- Now, you should see this:
- Clone the repository, and CD into it:
- Run
apply_template.py, and use the repository name as argument
- Commit, and push:
git add .
git commit -m "Initialized Project"
git push
- Start following the instructions at Project Setup


