PrimeAdapter makes working with RecyclerView easier
PrimeAdapter
PrimeAdapter makes working with RecyclerView easier by separating required code in some simple clean classes. It brings simplicity when you have multiple view types in a RecyclerView. You can use PrimeAdapter in both Kotlin and Java Android projects as the sample apps are written.
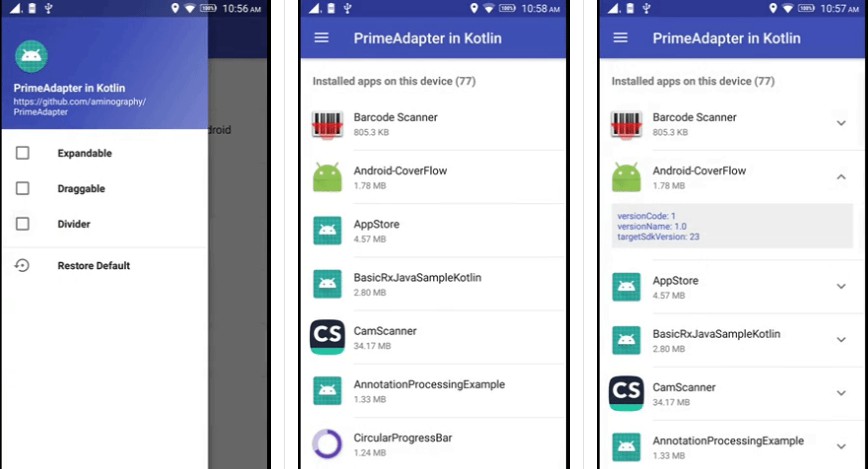
| Custom Divider | Draggability | Expandability |
|---|---|---|
 |
 |
 |
Download
Add the following lines to your build.gradle file:
apply plugin: 'kotlin-android'
apply plugin: 'kotlin-android-extensions'
apply plugin: 'kotlin-kapt'

repositories {
    jcenter()
}

dependencies {
    implementation 'com.aminography:primeadapter:1.0.6'
    compileOnly 'com.aminography:primeadapter-annotation:1.0.6'
    kapt 'com.aminography:primeadapter-processor:1.0.6'
}
- If you write code in Java, you should also add kotlin dependency too:
dependencies {
    implementation 'org.jetbrains.kotlin:kotlin-stdlib-jdk8:1.2.70'
}
How to use PrimeAdapter?
You should create both data holder and view holder classes for each type of view that you want to show in RecyclerView.
- It's necessary to add
@DataHolderannotation above all data holder classes which inherits fromPrimeDataHolder:
@DataHolder
data class ActorDataHolder(
        val name: String
) : PrimeDataHolder()
- Each view holder class should inherit from
PrimeViewHolderand specify related data holder as a type parameter like following:
class ActorViewHolder(
        delegate: PrimeDelegate
) : PrimeViewHolder<ActorDataHolder>(delegate, R.layout.list_item) {

    override fun bindDataToView(dataHolder: ActorDataHolder) {
        with(itemView) {
            nameTextView.text = dataHolder.name
        }
    }
}
- Your custom adapter class must inherit from
PrimeAdapterthat decides to make view holder instance based on data holder type.
Follow this pattern:
class ActorAdapter : PrimeAdapter() {

    override fun makeViewHolder(dataHolderClass: Class<*>?): PrimeViewHolder<*>? {
        return when (dataHolderClass) {
            ActorDataHolder::class.java -> ActorViewHolder(this)
            else -> null
        }
    }
}
- Finally, you can instantiate your custom adapter using
PrimeAdapterbuilder mechanism.
override fun onCreate(savedInstanceState: Bundle?) {
    super.onCreate(savedInstanceState)
    setContentView(R.layout.activity_main)

    val adapter = PrimeAdapter.with(recyclerView)
                    .setLayoutManager(LinearLayoutManager(activity))
                    .set()
                    .build(ActorAdapter::class.java)

    val dataList = mutableListOf<PrimeDataHolder>()
    dataList.add(ActorDataHolder("Tom Hanks"))
    dataList.add(ActorDataHolder("Morgan Freeman"))
    dataList.add(ActorDataHolder("Robert De Niro"))
    adapter.replaceDataList(dataList)
}
Extra Features
Handling Item Clicks
PrimeAdapter helps you handle RecyclerView items click events,
simply by setItemClickListener() with an OnRecyclerViewItemClickListener argument when you're building an adapter instance or later:
val adapter = PrimeAdapter.with(recyclerView)
                ...
                .setItemClickListener(onRecyclerViewItemClickListener)
                ...
                .build(ActorAdapter::class.java)

...
adapter.setItemClickListener(object: OnRecyclerViewItemClickListener{
    override fun onItemClick(primeDataHolder: PrimeDataHolder) {
        // do something
    }
    override fun onItemLongClick(primeDataHolder: PrimeDataHolder) {
        // do something
    }
})
Draggability
PrimeAdapter helps you make the RecyclerView items draggable.
It would be activated/deactivated by calling setDraggable(true)/setDraggable(false) on a builder or an adapter instance.
Optionally, you can get notified about item movements by calling setItemDragListener() and passing an OnRecyclerViewItemDragListener instance to it.
adapter.setDraggable(true)
adapter.setItemDragListener(object: OnRecyclerViewItemDragListener{
    override fun onItemMoved(fromPosition: Int, toPosition: Int) {
        // do something
    }
})
It is necessary to introduce a view as handle of dragging in view holders which are going to be draggable:
class ActorViewHolder(
        delegate: PrimeDelegate
) : PrimeViewHolder<ActorDataHolder>(delegate, R.layout.list_item) {

    init {
        setDragHandle(itemView)
    }
    ...
}
Expandability
Another feature of PrimeAdapter is making the implementation of RecyclerView items expansion easier.
Calling the setExpandable(true)/setExpandable(false) on a builder or on adapter instance changes its activation.
adapter.setExpandable(true)
To see how to implement it, please check the [related example code][2].
Custom Skippable Divider
Showing custom divider lines is a good feature that PrimeAdapter provides.
Calling the setDivider() on a builder or on adapter instance leads to show default divider line between items.
It's possible to pass it a custom Drawable instance or simply a color to change the divider looking.
Also we can set inset for divider drawables in pixels.
//----- default divider:
adapter.setDivider()

//----- divider with custom drawable:
adapter.setDivider(ContextCompat.getDrawable(context, R.drawable.divider))

//----- divider with custom color:
adapter.setDivider(Color.RED)

//----- divider with custom color and custom inset:
adapter.setDivider(Color.RED, insetLeft = 16, insetRight = 16)

//----- deactivate dividers:
adapter.setDivider(null)
By default dividers are shown for all items except the last one.
It's easy to skip some items divider by setting hasDivider property to false on their data holder instances.
adapter.getItem(position).hasDivider = false
adapter.notifyDataSetChanged()