Contains examples of using the Android FHIR SDK with the FHIR Access Proxy
FHIR App Examples
A repository containing example apps using the
Android FHIR SDK.
Currently, the only example is the demo app that shows how to
interact with the
FHIR Access Proxy.
Before you begin
What you’ll build
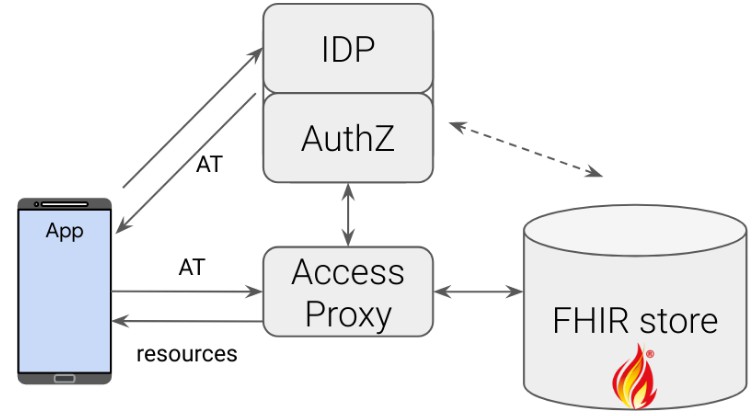
This repository shows an app built using the Android FHIR SDK interacting with the FHIR Access Proxy. The Access Proxy provides granular access control in front of any generic FHIR store. The job of this proxy is to let authenticated users access only what they are authorized to.
What you’ll learn
- How to integrate the Android FHIR SDK with the FHIR Access Proxy
- How the FHIR Access Proxy works
- How to implement interfaces for syncing FHIR resources
The diagram below shows the different components that are involved:

What you’ll need
- Java 8 or higher
- Android Studio installed, with an Android Emulator setup to run the app
- Docker
- Docker-Compose (must be at least v2)
App Setup
-
Clone the FHIR App Examples Repo:
git clone https://github.com/google/fhir-app-examples.git
-
Open Android Studio, select Import Project (Gradle, Eclipse ADT, etc.) and choose the
fhir-app-examplesfolder downloaded in the previous step. If this is your first time opening the project, the Gradle Build process should start (and take some time).
IDP, Proxy and HAPI FHIR Server Setup
-
Clone the FHIR Access Proxy Repo:
git clone https://github.com/google/fhir-access-proxy.git
-
Start the Keycloak Identity Provider Server. From the fhir-access-proxy directory, run:
docker-compose -f docker/keycloak/config-compose.yaml \
  up --force-recreate --remove-orphans -d --quiet-pull
The config-compose.yaml sets up a Keycloak instance that can support both a list-based access control and a single-patient based SMART-on-FHIR app (in two separate realms).
The
keycloak-configimage is built using the Dockerfile here. A key component of the Dockerfile is the keycloak_setup.sh. There are two points of interest in this script: the first is this, which creates a client that authenticated users can act as, and here where we create a user that binds thepatient-list-examplevalue to thepatient_listclaim field that is part of the JWT access token. The default username and password used for the user are from the env file here. -
Start the FHIR Access Proxy and HAPI FHIR Server (don’t forget the
--waitflag):ALLOWED_QUERIES_FILE="resources/hapi_page_url_allowed_queries.json" \ RUN_MODE="DEV" \ docker-compose -f docker/hapi-proxy-compose.yaml \ up --force-recreate --remove-orphans -d --quiet-pull --wait
The
hapi-proxy-compose.yamlconfigures the FHIR Access Proxy and a pre-loaded HAPI FHIR Server with synthetic data, with the default environment variables being set in the .env file. TheTOKEN_ISSUERvariable is the IP of the Keycloak IDP from the previous step, and thePROXY_TOvariable is the IP of the FHIR server. As we are running theTOKEN_ISSUERand FHIR Access Proxy on the same machine (but on different ports), we need to bypass the Proxy’s token issuer check by setting the environment variableRUN_MODEtoDEV.WARNING: Never use
RUN_MODE=DEVin a production environment.Part of setting up the FHIR Access Proxy is choosing the type of
AccessCheckerto use . This is set using theACCESS_CHECKERenvironment variable (See here for more detail). In this demo, we will use the default value oflist, which will use theListAccessCheckerto manage incoming requests. This access-checker uses thepatient_listID in the JWT access token to fetch the “List” of patient IDs that the given user has access to. There are some URL requests that we want to bypass the access checker (e.g. URLs with_getpagesin them) and we declare these rules inhapi_page_url_allowed_queries.json. To make the server use this file, we set the environment variableALLOWED_QUERIES_FILE.
Running the App
-
In Android Studio, with an Android Emulator installed, run the
demoapp by pressing on the “Play” button on the top bar -
This will build the app, and open the Emulator
-
When the app successfully launches, the Run logs will be available in the Run tab at the bottom, and the app will have booted on the Emulator
-
In the Emulator, press the Log In button, which will take you to the IDP login screen. Type testuser as the username and testpass as the password.
-
The app will then start the syncing process. You can see this in the logs displayed in the Run tab
How the App Works
Initial Launch
When the app is launched, the first class launched is
FhirApplication
, as it is a subclass of
Application
and specified in the "android:name" field in
AndroidManifest.xml. Part of the
FhirApplication class instantiates a
ServerConfiguration.
We pass into the ServerConfiguration the URL of the FHIR Access Proxy. As we
are running the Proxy and the App from the same machine, we use
10.0.2.2 as a
special alias to the host loopback interface (i.e., 127.0.0.1 on the same
machine). We also pass into the ServerConfiguration an instance of
Authenticator
for supplying the Proxy the JWT access token;
LoginRepository
is the implementation of Authenticator we wrote.
Fetching Access Token
Our end-to-end setup uses OAuth 2.0 authorization code flow to retrieve an access token.
After initializing the FhirApplication class, the next class launched is the
LoginActivity
class, as specified by the intent filters in the AndroidManifest.xml file. The
LoginActivity class initializes the
LoginActivityViewModel
class; the LoginActivityViewModel contains two methods that are called by
LoginActivity: createIntent and handleLoginResponse. The first method
returns an
Intent that
is bound to the Log In button. The intent is built by first fetching the
Discovery Document
from the Proxy. The URL to the Proxy discovery endpoint is loaded from the
auth_config.json. When a request to the
Proxy is made to this endpoint, it returns a response that includes the value of
TOKEN_ISSUER, which is needed to create the login Intent.
When the Log In button is pressed, the Intent opens a webpage to the login
screen with the value of TOKEN_ISSUER as the base URL, where the user is
prompted to type in their credentials. Once the user logs in, the callback
defined in the getContent variable in LoginActivity runs, which takes the
response from the IDP containing an
authorization code,
and passes it to the handleLoginResponse method. This method abstracts the
exchange of the authorization code for an access token, which is stored in the
App. Any call in the app now made to LoginRepository.getAccessToken fetches
the stored JWT, and if expired, refreshes the token.
Download Resources
Once the user logs in, the
MainActivity
class is launched, which instantiates the
MainActivityViewModel
class. When MainActivityViewModel is initialized, it launches an instance of
SyncJob.
One of the parameters we need to pass in to the SyncJob.poll method is an
implementation of the
FhirSyncWorker
abstract class, which we provide via the
FhirPeriodicSyncWorker
class.
FhirPeriodicSyncWorker implements two methods, one of which is
getDownloadWorkManager. The implementation of that method requires a
DownloadWorkManager
returned, a class that we also have to implement. We have to provide a way for
the SDK to generate the FHIR download requests and handle the FHIR responses
returned, and we do that via the
DownloadWorkManagerImpl
class. This class takes in an initial resource ID to seed the first download
request; this resource ID comes from the value of the patient_list claim that
is part of the JWT access token now stored on the App.
As we logged in as testuser, the value of patient_list will be
patient-list-example, which we defined in Keycloak. patient-list-example is
the ID of a List resource on the FHIR server that we first want to fetch. With
FhirPeriodicSyncWorker and DownloadWorkManagerImpl instantiated, the
SyncJob.poll method runs and downloads all resources as specified in the
classes we created.