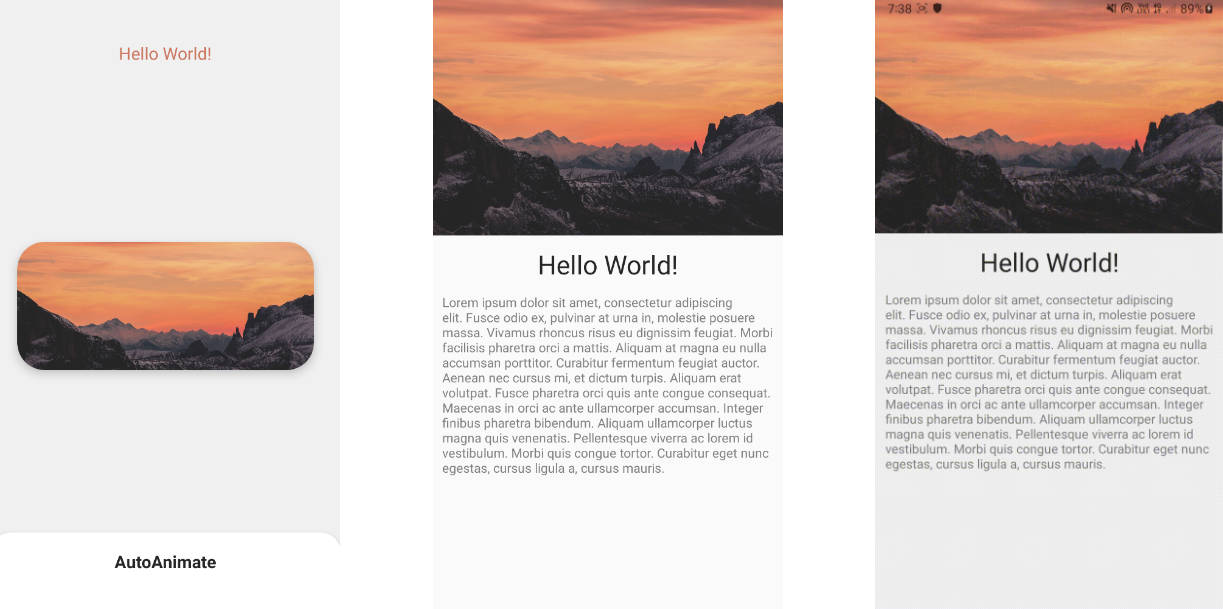
A custom Shared Element Transition that automatically animates your views based on Figma Smart Animate

AutoAnimate
AutoAnimate is a custom Shared Element Transition that automatically animates your views based on Figma Smart Animate.
| FragmentA | FragmentB | Transition |
|---|---|---|
 |
 |
 |
Supports:
- Layout
- Scale
- Rotation
- Translation
- Background
- Color
- TextSize
- TextColor
- CornerRadius
- Elevation
You can customize duration, delay, interpolator and every other properties!
Installation
AutoAnimate is available in the mavenCentral(), so you just need to add it as a dependency (Module gradle)
Gradle
implementation 'io.github.aghajari:AutoAnimate:1.0.2'
Maven
<dependency>
  <groupId>io.github.aghajari</groupId>
  <artifactId>AutoAnimate</artifactId>
  <version>1.0.2</version>
  <type>pom</type>
</dependency>
Usage
- Step1: Create your fragments (or activities)
- Step2: Design your layouts
- Step3: Set
sharedElementEnterTransition - Step4: Add your views to FragmentTransaction by
addSharedElement - Step5: Done!
val autoAnimateTransition = AutoAnimateTransition.build(
    duration = 500,
    interpolator = OvershootInterpolator()
)

fragment.sharedElementEnterTransition = autoAnimateTransition
sharedElementReturnTransition = autoAnimateTransition

supportFragmentManager
    .beginTransaction()
    .addToBackStack(null)
    .addSharedElement(view, view.transitionName)
    .replace(R.id.container, fragment)
    .commit()
Example
- Step1: Create FragmentA and its layout:
<?xml version="1.0" encoding="utf-8"?>
<FrameLayout xmlns:android="http://schemas.android.com/apk/res/android"
    xmlns:tools="http://schemas.android.com/tools"
    android:layout_width="match_parent"
    android:layout_height="match_parent"
    tools:context=".FragmentA">

    <View
        android:id="@+id/shape"
        android:transitionName="shape"
        android:layout_gravity="center"
        android:layout_width="56dp"
        android:layout_height="56dp"
        android:background="@drawable/bg_a" />

</FrameLayout>
- Step2: Create FragmentB and its layout:
<?xml version="1.0" encoding="utf-8"?>
<FrameLayout xmlns:android="http://schemas.android.com/apk/res/android"
    xmlns:tools="http://schemas.android.com/tools"
    android:layout_width="match_parent"
    android:layout_height="match_parent"
    tools:context=".FragmentB">

    <View
        android:id="@+id/shape"
        android:transitionName="shape"
        android:layout_gravity="center_horizontal"
        android:layout_marginTop="56dp"
        android:layout_width="56dp"
        android:layout_height="56dp"
        android:scaleX="2"
        android:scaleY="2"
        android:background="@drawable/bg_b" />

</FrameLayout>
- Step3: Start FragmentB by clicking on shape and Done!
private val autoAnimateTransaction = AutoAnimateTransaction.build(
    duration = 800,
    interpolator = OvershootInterpolator()
)
class FragmentA : Fragment() {

    override fun onCreateView(
        inflater: LayoutInflater, container: ViewGroup?,
        savedInstanceState: Bundle?
    ): View {
        return FragmentABinding.inflate(inflater).apply {
            shape.setOnClickListener { startFragment(FragmentB(), shape) }
        }.root
    }
}

class FragmentB : Fragment() {

    override fun onCreateView(
        inflater: LayoutInflater, container: ViewGroup?,
        savedInstanceState: Bundle?
    ): View {
        return FragmentBBinding.inflate(inflater).apply {
            shape.setOnClickListener { popBackStack() }
        }.root
    }
}

fun Fragment.startFragment(fragment: Fragment, view: View) {
    fragment.sharedElementEnterTransition = autoAnimateTransaction
    sharedElementReturnTransition = autoAnimateTransaction

    requireActivity()
        .supportFragmentManager
        .beginTransaction()
        .addToBackStack(null)
        .addSharedElement(view, view.transitionName)
        .replace(R.id.container, fragment)
        .commit()
}
Customize Properties
private val autoAnimateTransaction = AutoAnimateTransaction.build(
    mapOf(
        "shape" to listOf(
            LayoutAutoAnimate().apply {
                maxFraction = 1f
            },
            BackgroundAutoAnimate().apply {
                interpolator = LinearInterpolator()
                duration = 400
            },
            ScaleYAutoAnimate(),
            ScaleXAutoAnimate().apply {
                startDelay = 200
            },
        )
    ),
    duration = 800,
    interpolator = OvershootInterpolator()
)
| Transition | Customized |
|---|---|
Author
Amir Hossein Aghajari
SUPPORT ❤️
If you find this library useful, Support it by joining stargazers for this repository ⭐️
License
Copyright 2023 Amir Hossein Aghajari
Licensed under the Apache License, Version 2.0 (the "License");
you may not use this file except in compliance with the License.
You may obtain a copy of the License at

   http://www.apache.org/licenses/LICENSE-2.0

Unless required by applicable law or agreed to in writing, software
distributed under the License is distributed on an "AS IS" BASIS,
WITHOUT WARRANTIES OR CONDITIONS OF ANY KIND, either express or implied.
See the License for the specific language governing permissions and
limitations under the License.